|
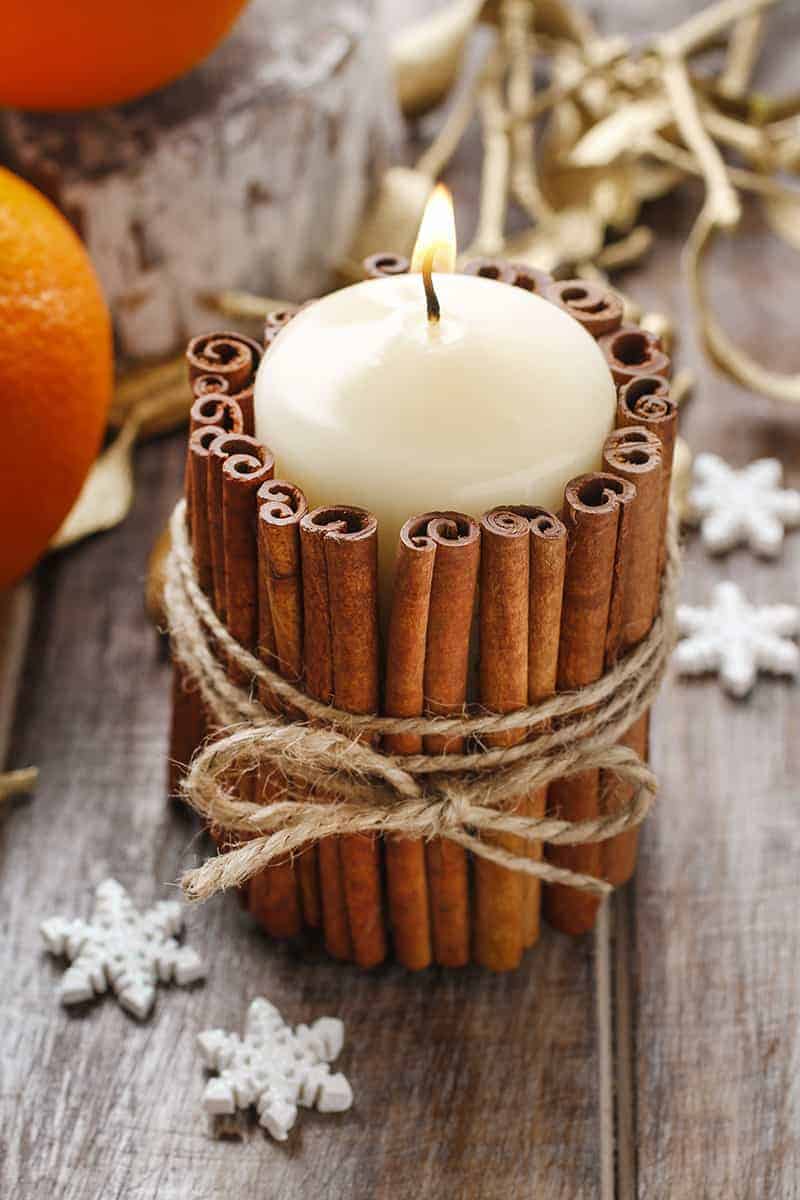
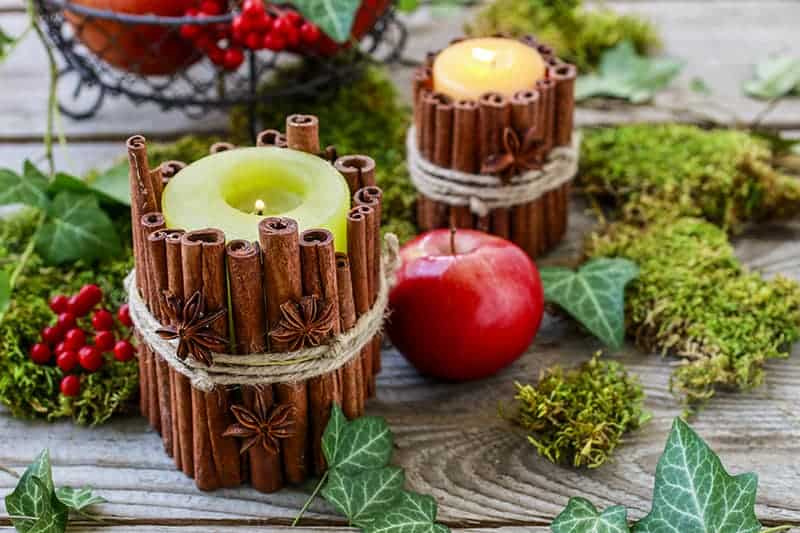
I think this might just be one of the best gift ideas. Not only it is beautiful, but it is cheap to make, takes only 2 steps to create and it is easy to customize depending on the occasion.
Of course, you could create these for yourself. We love using them as table decorations when we invite family or friends over on special occasions. You can image what beautiful aromas these candles have – I love the smell of cinnamon sticks!
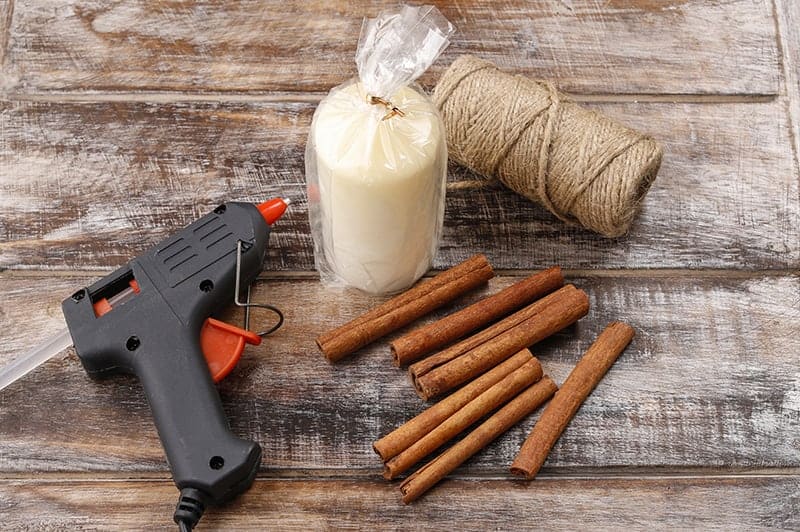
Easy 2 Step-Only DIY Cinnamon Stick Candle TutorialFind below the steps to show you how easy it is to whip up these beautiful candle gifts. Supply List:
1 x Unscented Candle 1 x Packet of Cinnamon Sticks Jute Twine Hot Glue Gun and Glue Sticks Optional: Ribbon, Lace, Star Anise, Baby Cones etc.
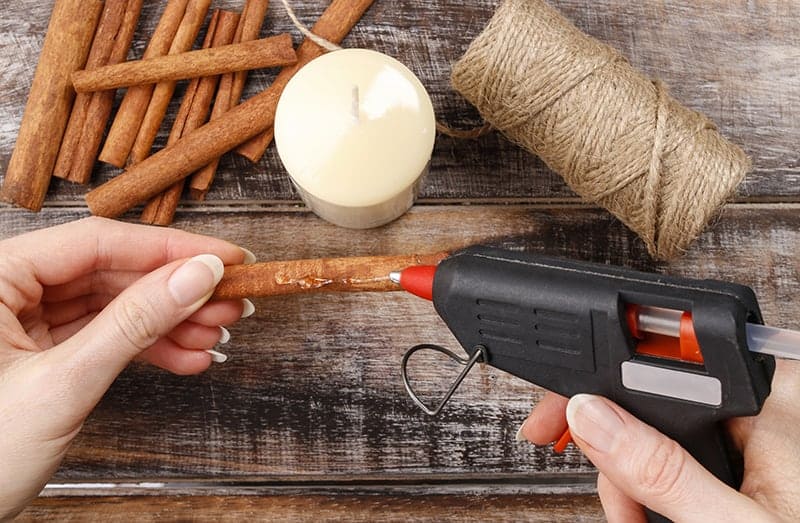
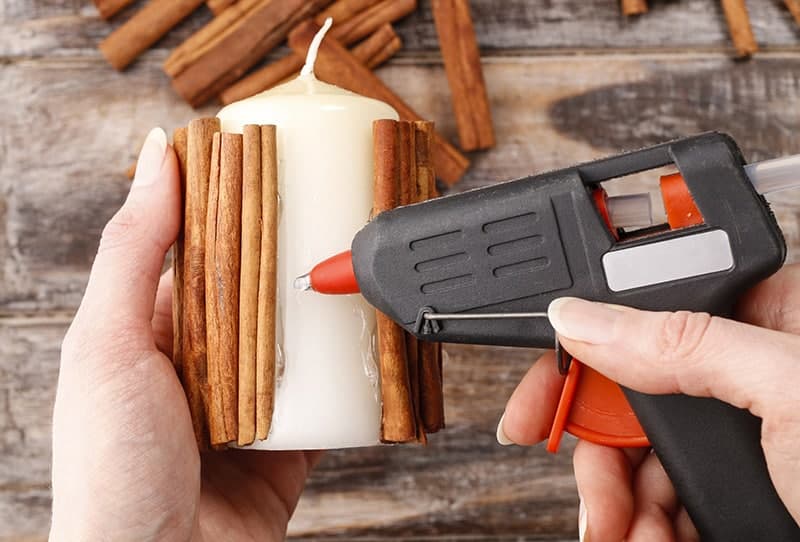
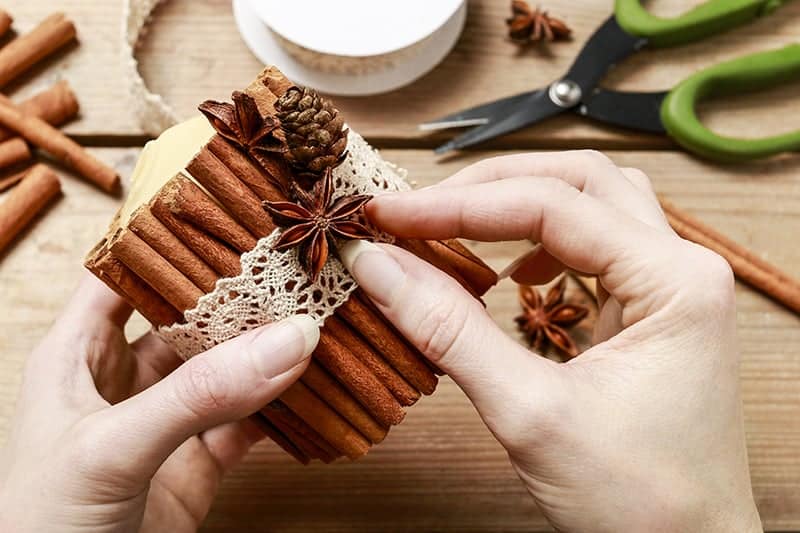
Instructions:Step 1: Heat up your glue gun and simply stick your cinnamon sticks onto the candle with some hot glue. Repeat until you have covered the whole candle.
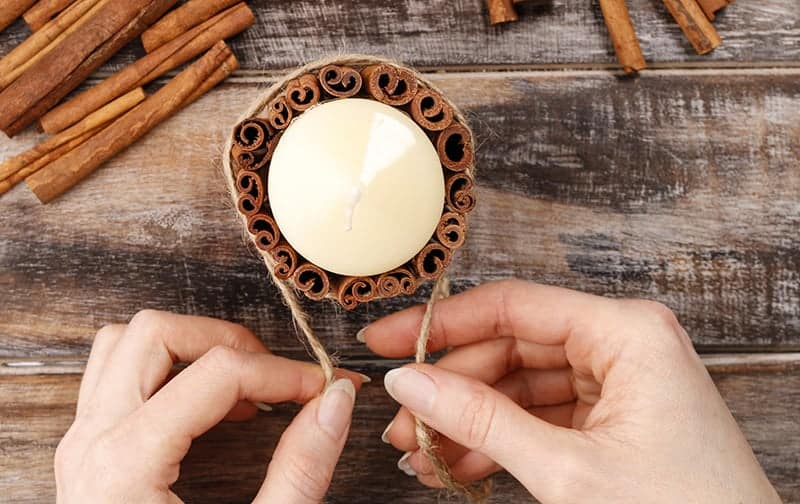
Step 2: Cut off a long piece of the twine and wrap it around your cinnamon sticks a few times, before tying it in a bow.
And that might possibly be one of the quickest and easiest DIY gifts that you have ever made!? And how effective does it look!
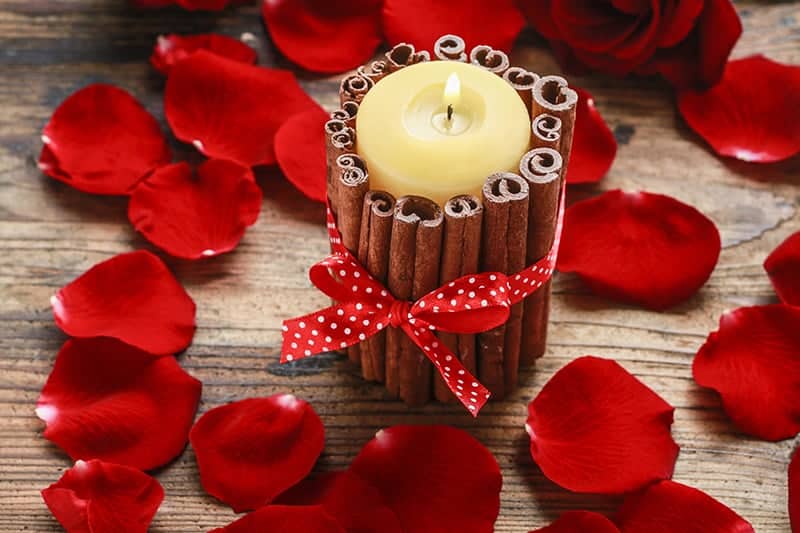
Idea 1: DIY Gift Idea for ValentinesUse a red candle instead of the white. Use a red bow to tie off the cinnamon sticks. Super easy, super sweet and perfect for that someone special on Valentine’s day.
Idea 2: DIY Gift Idea for a BirthdayTake your basic candle idea one step further. Use a lovely colored candle in the center. Follow the tutorial above, but instead of tying a bow with the twine, think about adding some knots instead. Then add some beautiful Star Anise. You can simply use your hot glue and glue them onto the decorated candle.
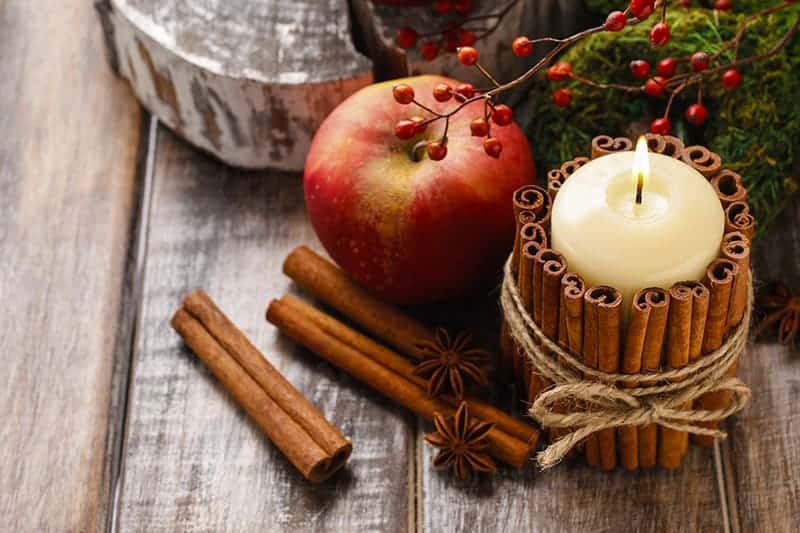
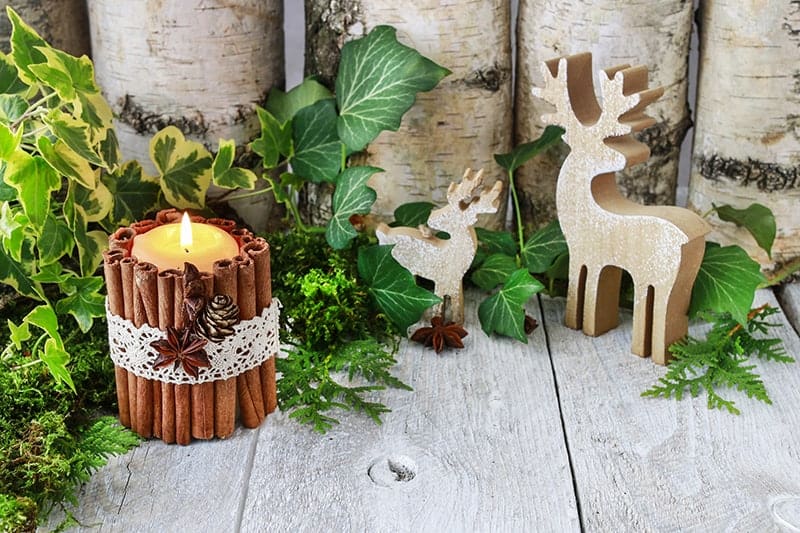
Idea 3: DIY Gift Idea for ChristmasStep up your game with these simple additional extras. Use a lovely soft cream colored candle. Surround your candles with cinnamon sticks. This time tie it all together with a beautifully soft piece of lace. Embellish the candle with 2 Star Anise and one baby cone. Super elegant and perfect as a Christmas DIY gift.
I love pairing up the candle with a few other bits and pieces, such as a nice packet of bath salts, or a gift card to a cooking store or a voucher for a spa treatment. Simply wrap it up in brown paper, tie it together with some twine. We love using our die cutting machine to simply whip up some beautiful die cuts. You can stamp a birthday message on the die cut, punch a hole at the top and add it to the twine as your birthday card. These are fabulous, aren’t they? We are so might chuffed with this idea and I hope you love it too. Till next time, Samantha xxx The article Easy 2 Step DIY Cinnamon Stick Candle Gift Tutorial was originally published on: thebestvinylcutters.com via WordPress https://cuttercraftsbysamantha.wordpress.com/2018/11/21/easy-2-step-diy-cinnamon-stick-candle-gift-tutorial/
0 Comments
So you have a new addition to the family – congratulations! If you are one of the lucky parents, you might even have some time to whip up some sweet baby scrapbook layouts. But I bet the brain might be a bit tired and you might be struggling to come up with some baby scrapbook ideas. That is okay, we totally understand! In this post, you will find 15 fabulous baby scrapbook page ideas to help inspire your creativity. Our designer, Jolene, has three beautiful daughters, so whilst our post is full of baby girl scrapbook ideas, you can easily use the same principles and features for baby boy pages (just used some boy papers and embellishments – easy!). Your baby’s first scrapbook is a truly important one, so don’t rush the process, allow your time to play until you are happy with the placement of your photos and all the elements of the baby scrapbook pages.
15 Newborn Baby Scrapbook Ideas Find below 15 baby scrapbook album ideas. I’m not sure which is our favorite scrapbook baby layout that is featured below, but if you have one, we would love to know which one you loved the most in the comments below.
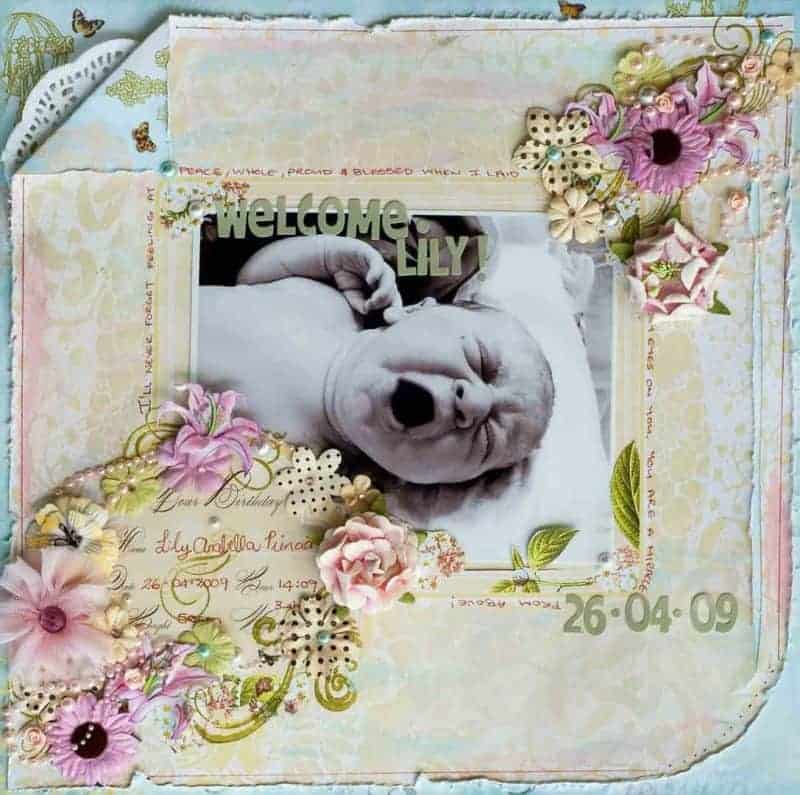
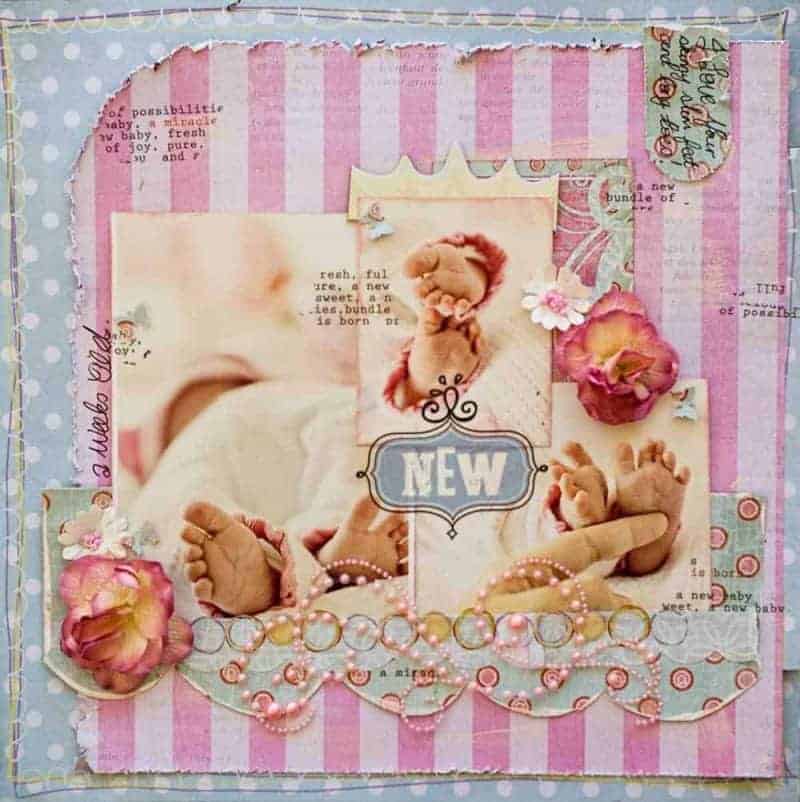
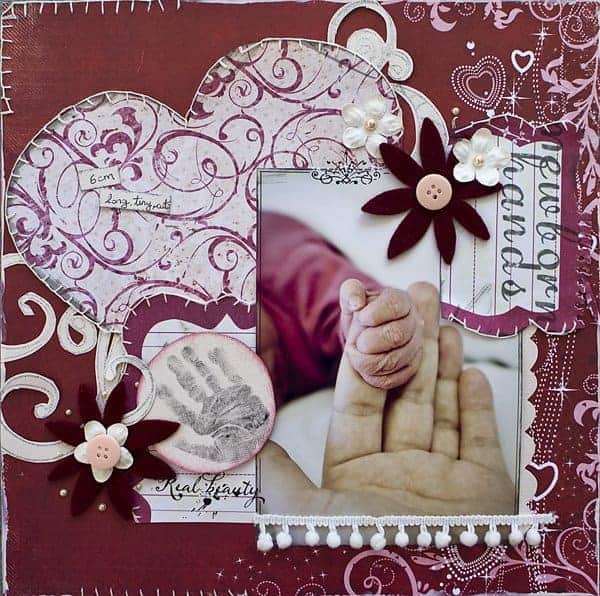
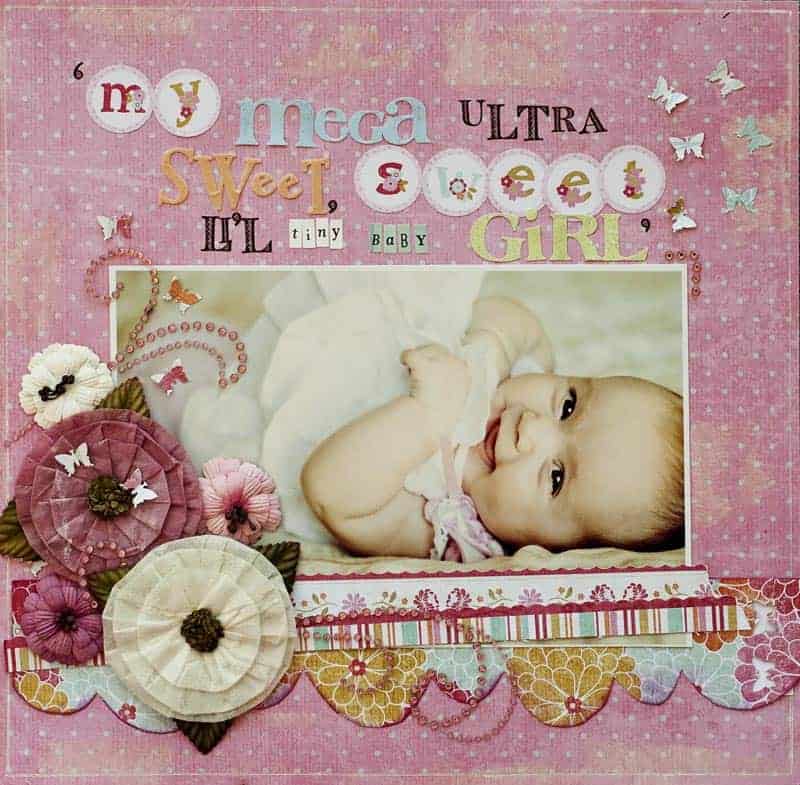
#1 Welcome Baby Girl Scrapbook Page
I think the ‘welcome baby’ scrapbook page is always the hardest one to make. Not only because your baby is probably covered in blood and amniotic fluid, but also because there is so much emotion attached to the photo. Jolene says that this photo was a bit ‘gross’ in color, which is why she reverted to a softer black and white photo. She tried to add ‘pretty’ with the spray of flowers. I think it sets off her baby daughter beautifully.
#2 Baby Girl Scrapbook Ideas: Recording Details
I love this layout because all it does is focuses on the details. A sweet layout to give a perception to how teeny tiny those sweet baby feet truly are. Make sure to record the details of your baby, because they grow up so fast and before long these moments will be forgotten.
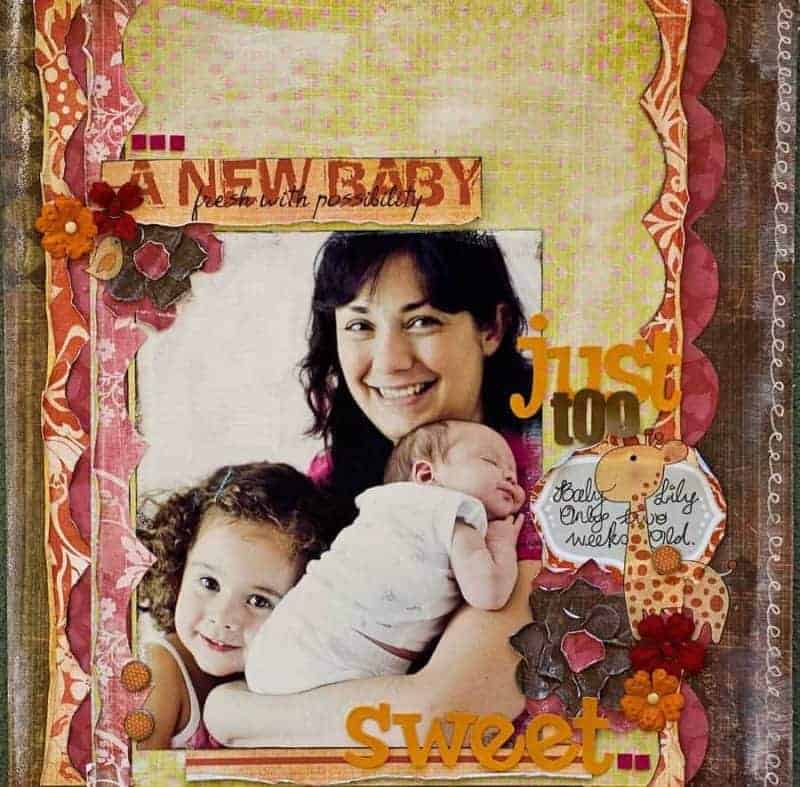
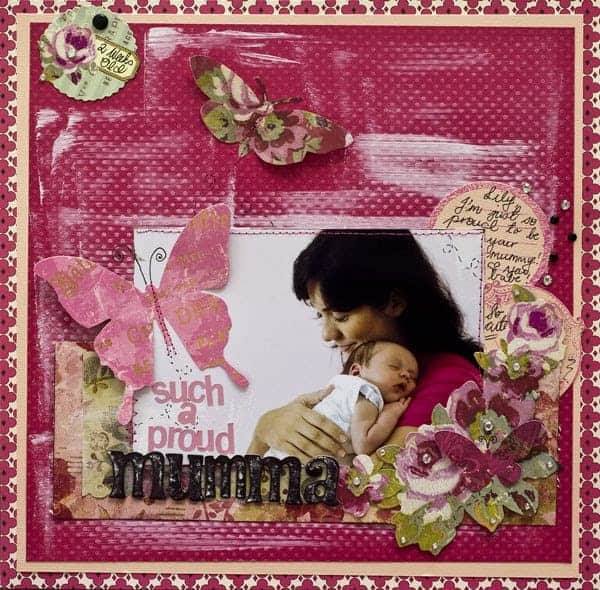
#3 Baby Scrapbook Page Ideas: Mummy and Daughter
Don’t forget to grab a photo of yourself with your baby. The best moment to do so is when your newborn baby is fast asleep. Tip: If you find that your papers or cardstock feel to ‘hard’ for a baby layout, you can always soften them up by dry brushing some white paint over the top.
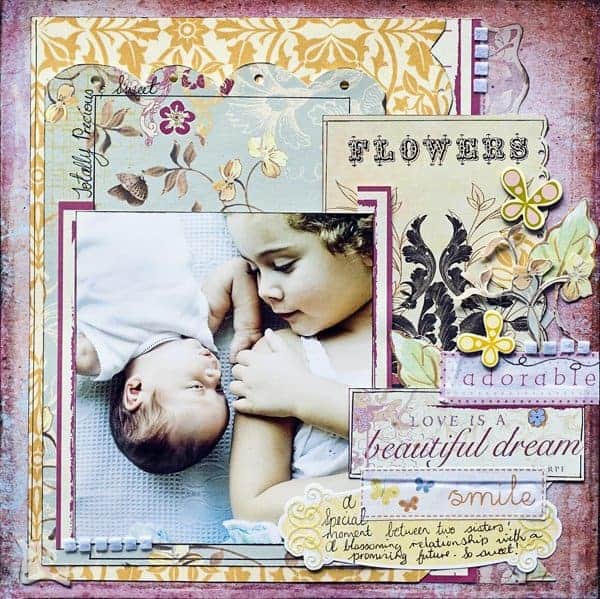
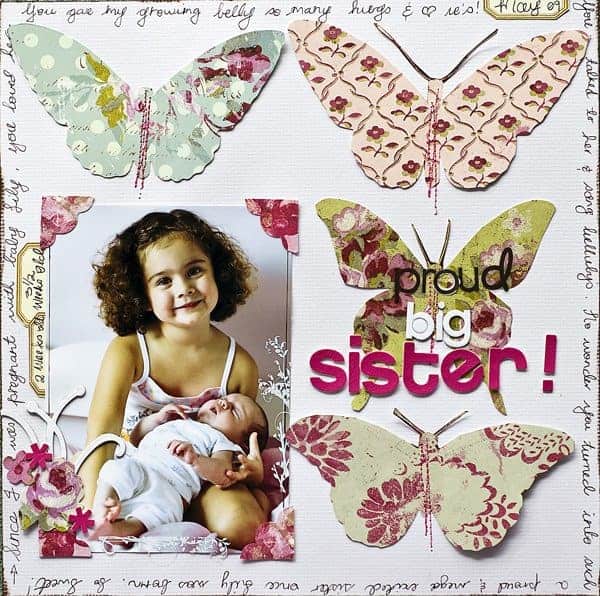
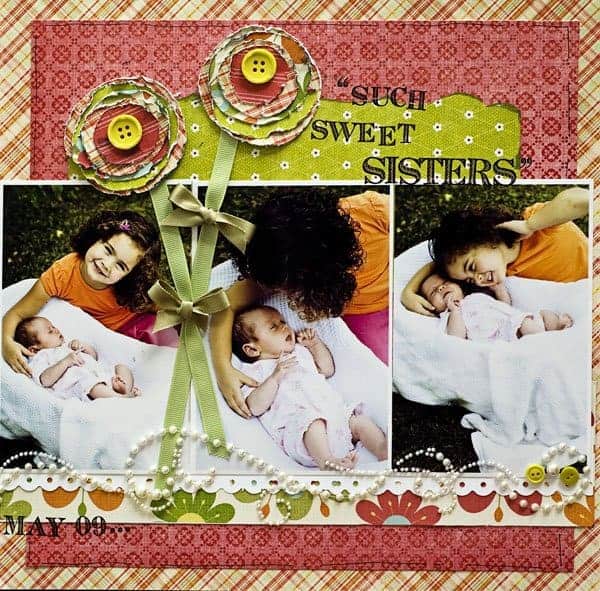
#4 Baby Scrapbook Pages to Record Sibling Moments
Absolutely in love the way that Katie is staring at her new baby sister her. Make sure to record those new sibling vibes – even if they aren’t so pleasant. Describe the feelings and the emotions to make the layout even more sentimental.
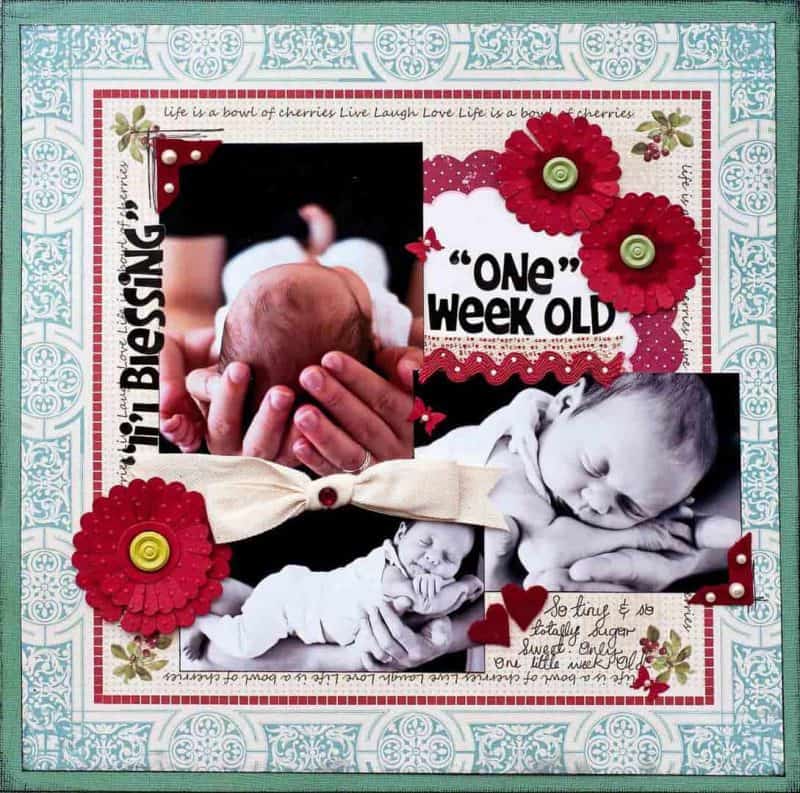
#5 Baby Book Ideas Scrapbook Pages to Show the Size
Back to showcasing your new baby’s size. Think about grabbing photos that clearly give proportion to your baby’s size. Jolene used Lily’s dad here and his hands helped to tell the picture of how teeny tiny Lily truly was. Those red flowers on the layout were created with scalloped circles. You can easily create scallop circle die cuts with a manual die cutting machine, such as the Cuttlebug Die Cutter. Simply snip down each scallop and roughen up the petals. Layer them up and add a brad, pearl or some bling in the center.
#6 Baby’s First Scrapbook: Baby Holding Mum’s Finger
Another clever way to show size. Grab a photo of your baby holding your finger! And if possible, try to get a handprint of the size so that you can add it to the layout as well.
#7 Baby Scrapbook Album Ideas: Recording Sweet Moments
We all take photos of our babies that we think are absolutely adorable. It is important to scrap those and to record them so you can look back at them in the future. My favorite photos of babies are either when they smile for the first time or when they yawn – so cute!
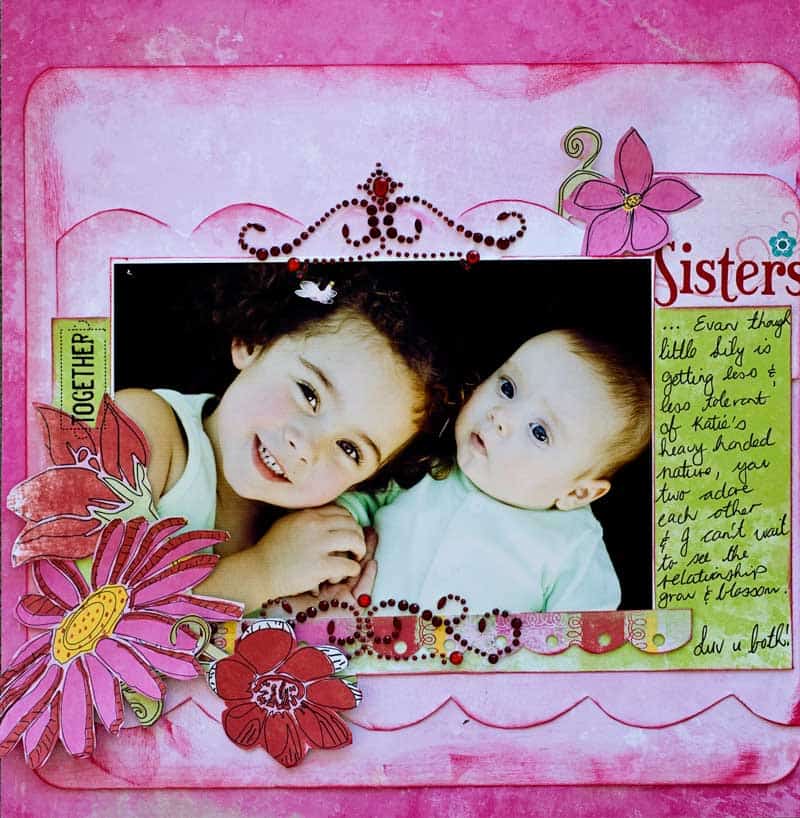
#8 Scrapbook Baby Layout to Showcase New Family Relationships
Another sibling layout. Katie’s proud face says it all! Don’t forget to add some journaling on your layout to record some of the detail of the new blooming sibling relationship.
#9 Scrapbook for Newborn Baby
Look at that little baby face – totally milk-drunk here! This layout is maybe more about mum, instead of the new baby. It is important to record your own feelings too, even if the feelings include being tired, drained and scattered. You can always create some hidden journalling if you don’t want all your emotions and feelings visible.
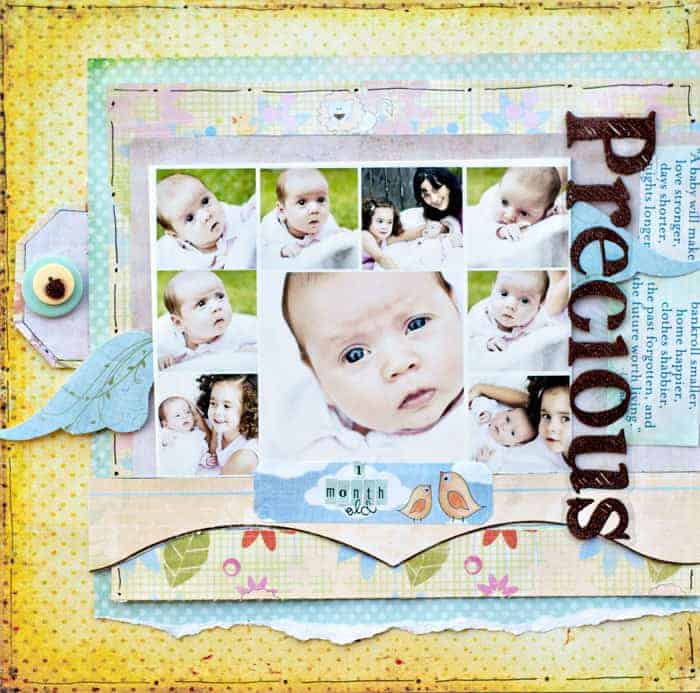
#10 Baby Scrapbook Layouts To Record Favorite Baby Features (Such as the Eyes)
What is one of the features of your baby that you love the most? Jolene says that those steel blue eyes really captured her from the moment of birth. The color didn’t last, Lily now has brown eyes, which is why it is so important to grab photos of the features that you fall in love with. So that you have that memory recorded.
#11 Baby Layouts to Record Love Shared
Capture the moments of love, whether it is between siblings, or dad and daughter, or dad and son, or grandparents and grandchild. I think it is important to record those photos. They will be priceless for your child one day when they are old enough to appreciate their first scrapbook album.
#12 Sweet Baby Layouts to Record Favorite Photos
Sometimes you manage to capture a photo at just the right time. This was one of those moments. Little Lily decided she is hungry and instinctively reacted to the skin rubbing past her mouth – so she was going in for a drink haha!
#13 Baby Pages to Record Baby’s Firsts (Such as the First Smiles)
Of course, it won’t be long till baby knock off those ‘first’ moments. The first smile, the first crawl, the first mouth full of food. Don’t forget to grab photos and to scrap those very important moments.
#14 Layouts to Record Growth and Changes (Check out the Hair going Orange??)
Things change. Your baby’s eyes might change color or if this case we went towards orange tinged hair (but she is back to brown again now!). When you notice those subtle changes, make sure to snap some photos.
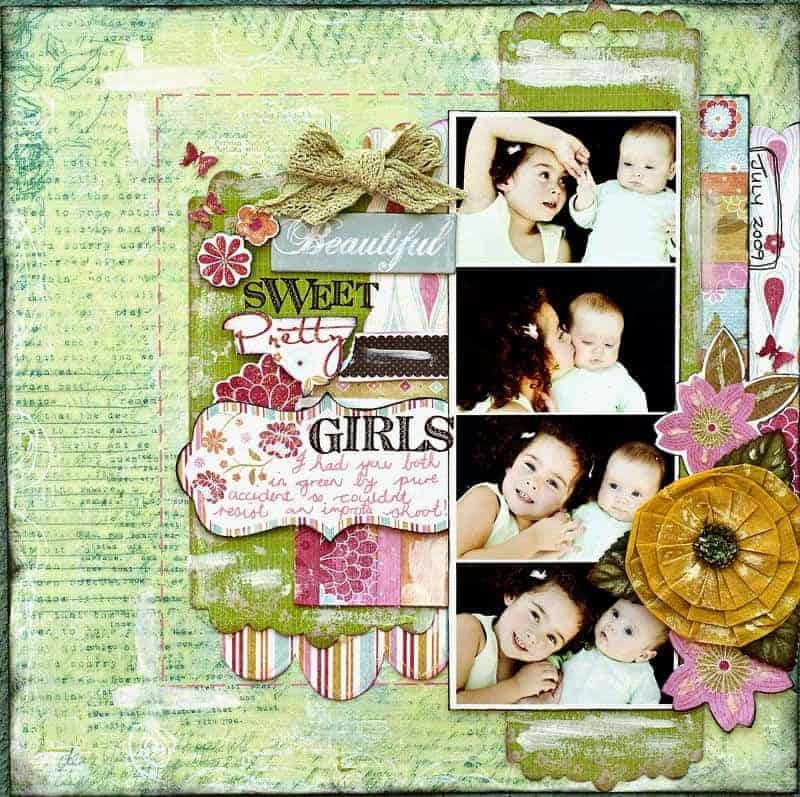
#15 And of Course Baby Scrapbook Layouts – Just Because!
And lastly, don’t be afraid to try out bolder and brighter colors with your baby photos. Jolene had Avalee in a green outfit here, so she could play with strong pinks in the paper without the layout feeling like a ‘pink-overload’.
As always, we love seeing your creations, so please leave us a comment below and tell us all about them. Till next time, Samantha xxx The following post 15 Newborn Baby Scrapbook Ideas for Baby’s First Album was originally published on: https://www.thebestvinylcutters.com/ via WordPress https://cuttercraftsbysamantha.wordpress.com/2018/11/20/15-newborn-baby-scrapbook-ideas-for-babys-first-album/
One of my favorite easy Thanksgiving crafts for kids is the simple paint-handprint on a canvas to create a fun turkey.
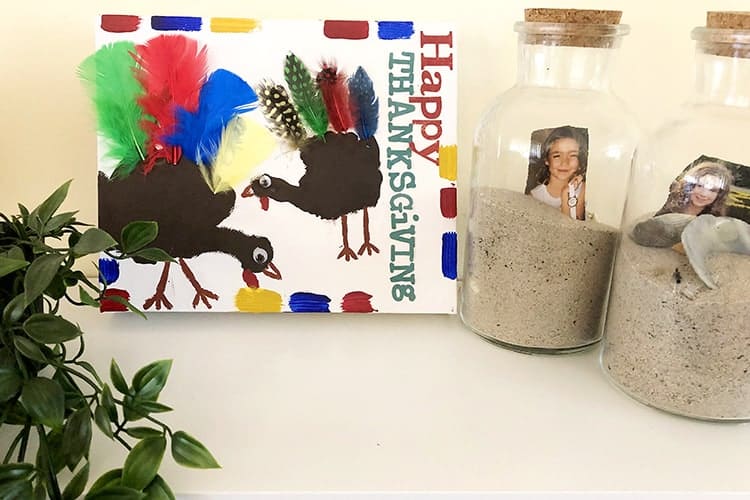 This popular Thanksgiving kids craft is definitely not new, but I wanted to pop a bit of a twist on the old favorite that includes different colored fingers by using some funky bright colored feathers instead. I also had a bit of fun by joining in on the action and doing my own handprint turkey as well. My daughter had loads of fun painting my hand and instructing me on how to do the print. This kids craft for Thanksgiving is perfect for toddlers and younger kids. My daughter is currently 2.5 years and she loved some aspects of the craft (such as the handprint and gluing the feathers), but she lost interested when it came to the detailed bits. Because you are incorporating feathers and alphabet stickers, I think even older kids up to the age of 10 might enjoy doing this activity. You can even step up the challenge by getting the older kids to create their own alphabet stickers on your sticker die cut machine. Find the full instructions on how to recreate the turkey dow below.
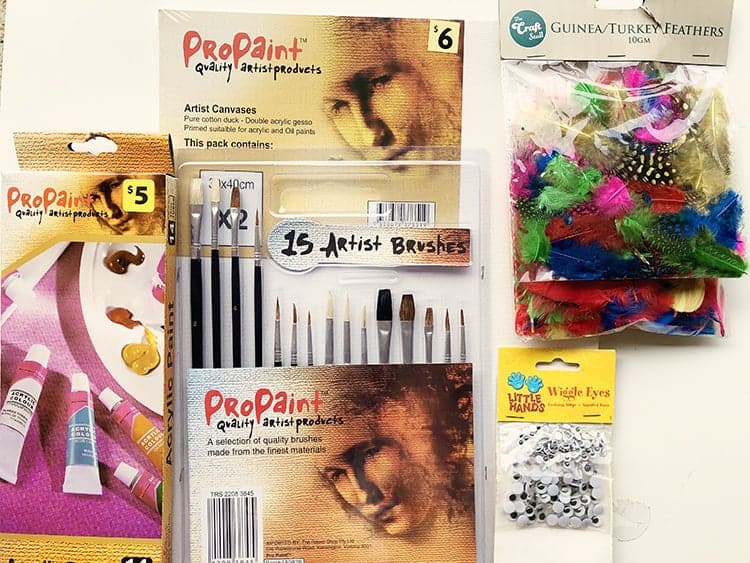
Easy Turkey Handprint Thanksgiving Craft for KidsFind below the full step-by-step instructions on how to recreate this Thanksgiving art for kids. Supplies Required:
1 x Canvas (25cm x 20cm) Tube of Light Brown, Dark Brown, and Red Acrylic Paint 1 x Packet of Bright Colored Feathers 1 x Packet of Googly Eyes 1 x Packet of Alphabet Stickers (or Alphabet Stamps and Ink) 1 x Packet of Paint Brushes (I found it easier to simply use a new paintbrush for each color rather than trying to clean one in between steps) Glue Optional: Blue, Red, and Mustard Colored Paint for Border Optional: Baby Wipes to Wipe Hands Optional: White Paint to Fix up Smears of Paint on Background Optional: Hair Dryer to Speed up Paint Drying Process
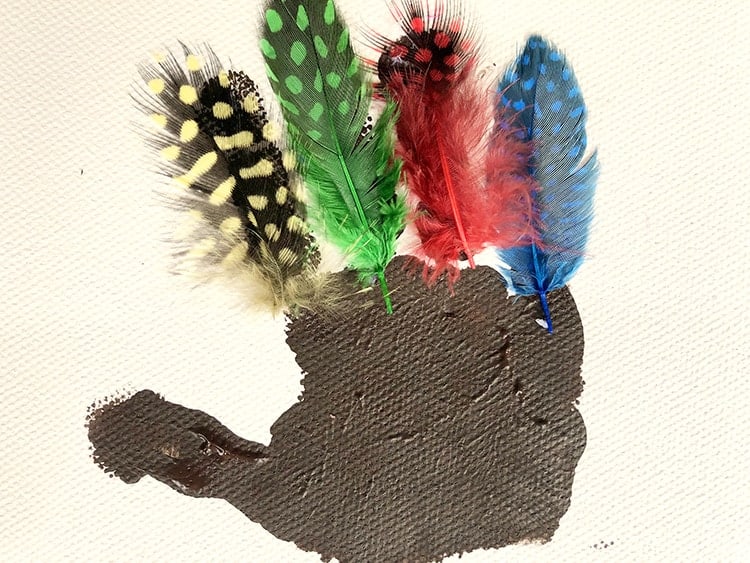
Instructions:Step 1: Apply dark brown paint to the palm and thumb of your child’s hand. Press down the print onto the canvas. Step 2: Apply dark brown paint to your own palm and thumb and press down onto the canvas. Tip: Use a hair dryer to speed up the drying process of the paint. Step 3: Once the paint is dry, glue down some feathers.
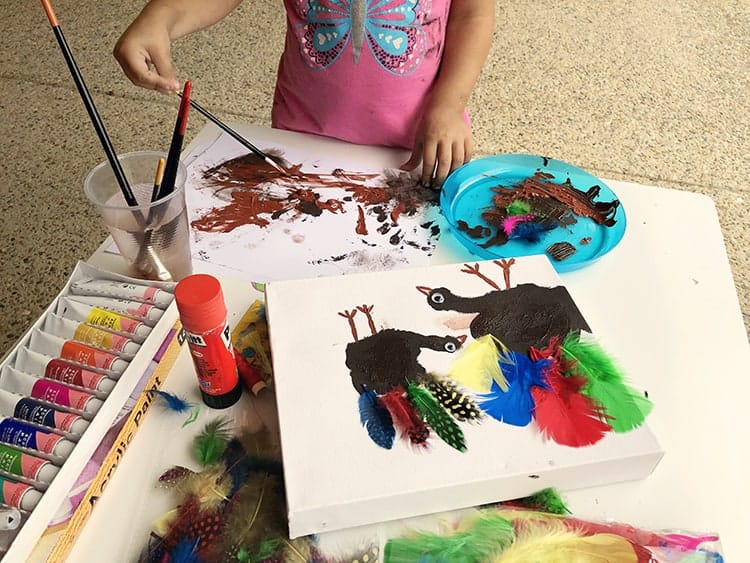
Step 4: Adhere a googly eye to each of the turkeys. Step 5: Add a beak and sticky legs with some light brown paint. Step 6: Add the red snood to the turkey. Tip: Use the hair dryer to dry the paint before proceeding. Step 7: Once the paint is dry, fix up any smears of paint on the background with some white paint. My daughter randomly painted over the turkey at one paint, but fortunately, I could save it by wiping off the excess with a wet wipe and simply painting a few layers of white over what was left of the paint. (See if you can spot the big smear below – notice I gave her paper to keep her busy in between steps)
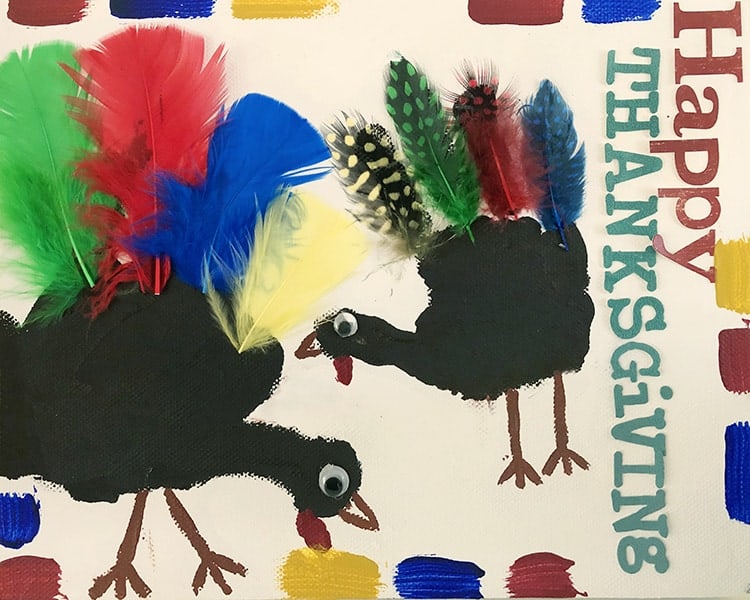
Tip: Use the hair dryer to dry the paint before proceeding. Step 8: Add some alphabet stickers to your canvas. Alternatively, your child might prefer having fun with some alphabet stamps and some ink. My daughter is only 2.5 years, so I played it safe with stickers that I could fix up after her attempt. Step 9: Finish off your canvas with some short smears of red, blue and mustard paint.
I’m not sure I’m loving this border I created, but I really felt like the canvas needed something around the edge. So I’ll leave it up to you whether you wish to do this step or not.
You can find loads more projects, tutorials and ‘how-to’ posts on our DIY craft blog here. Till next time, Samantha xxx The following article Easy Thanksgiving Craft for Kids: Turkey Handprint & Feathers was originally seen on: https://thebestvinylcutters.com via WordPress https://cuttercraftsbysamantha.wordpress.com/2018/11/20/easy-thanksgiving-craft-for-kids-turkey-handprint-feathers/ How many of you have die cuts lying around in your craft room – unloved and unused? I bet we all do! We might buy a whole sheet of die cuts, simply because we loved 2 or 3 of them, but the rest? No idea what to do with them. I hate waste, so for this project today, I wanted to find ways in which I could use those random die cuts and whip up some DIY custom birthday cards. These die cuts are really old! They are by Fancy Pants (I think??), but I think they can easily be 5 or so years old! So I did good, don’t you think?
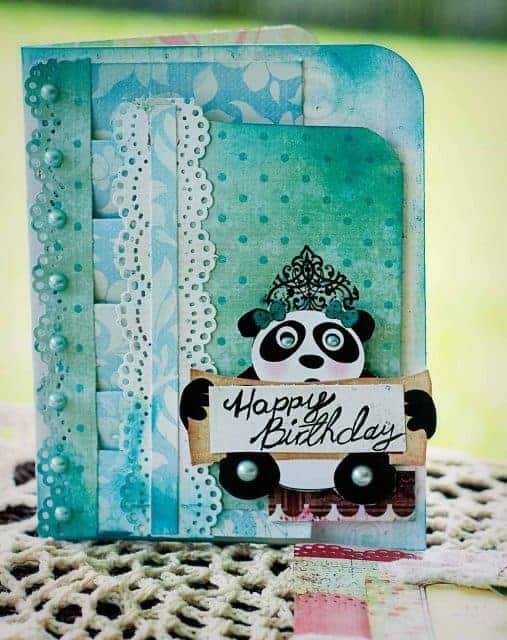
1. DIY Happy Birthday Card
This beautiful Happy Birthday card was created by using a panda die cut as a feature. I wasn’t sure where else to use this die cut, but you have to admit she is pretty cute! The die cut itself already had a saying on the banner between the hands (I forget what it said) – so if you look closely you will notice that I simply popped a piece of paper with a handwritten ‘Happy Birthday’ over the top to cover it up. I really wanted the panda to be the focus, so I lifted her away from the background with some 3D foam. I embellished her eyes and feet with some pretty pearls and gave her a crown with a flourish-style rub-on. I also folded some normal paper to give a bit of a ‘ribbon’ effect along the left edge. I really love this card and think it came out beautiful!
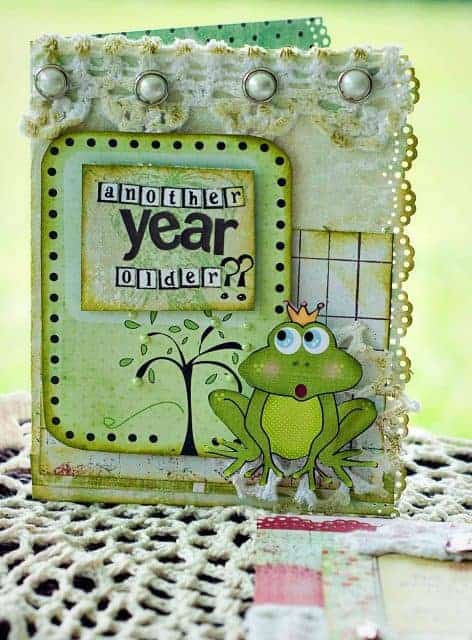
2. DIY “Another Year Older” Card
Very obviously this card is made with the frog die cut. Bit of a weird choice for a card, but I really do feel that the frog really works well here. The card next to the frog with the tree on it, is another die cut from a journaling die cut sheet. Again I lifted the frog away from the background with some foam tape. I used a decorative edge punch to give the right edge a creative look. Added some cut up doily bits for some lovely texture and simply rubbed some green ink over the doilies to give them a bit more of a muddy pond feel. I finished the card off with some pearl bling and some pearl brads. I really felt like the pearls would elevate the card to something more elegant (but still fun).
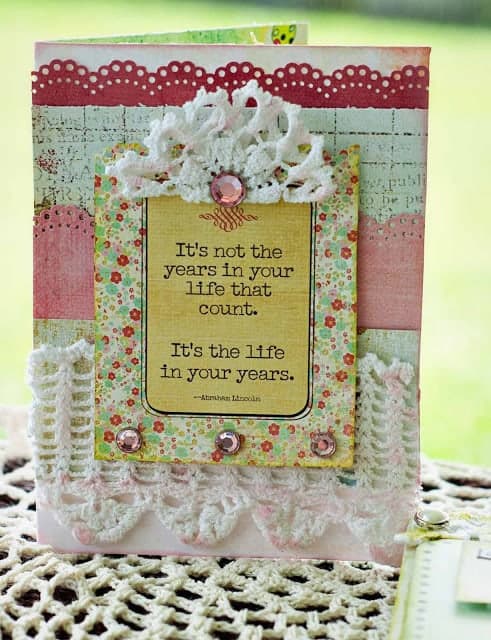
3. DIY “Life in your Years” Card
For this card, I grab another die cut. This die cut already had this quote on it that I felt was perfect for a birthday card for someone a bit older. More foam tape for dimension and more doilies to add a lovely ‘home’ feel. This time I added some bling brads as I felt they just brightened and lifted the layout (where the pearls were making the card feel ‘old’) Some more decorative borders – quick and easy card done!
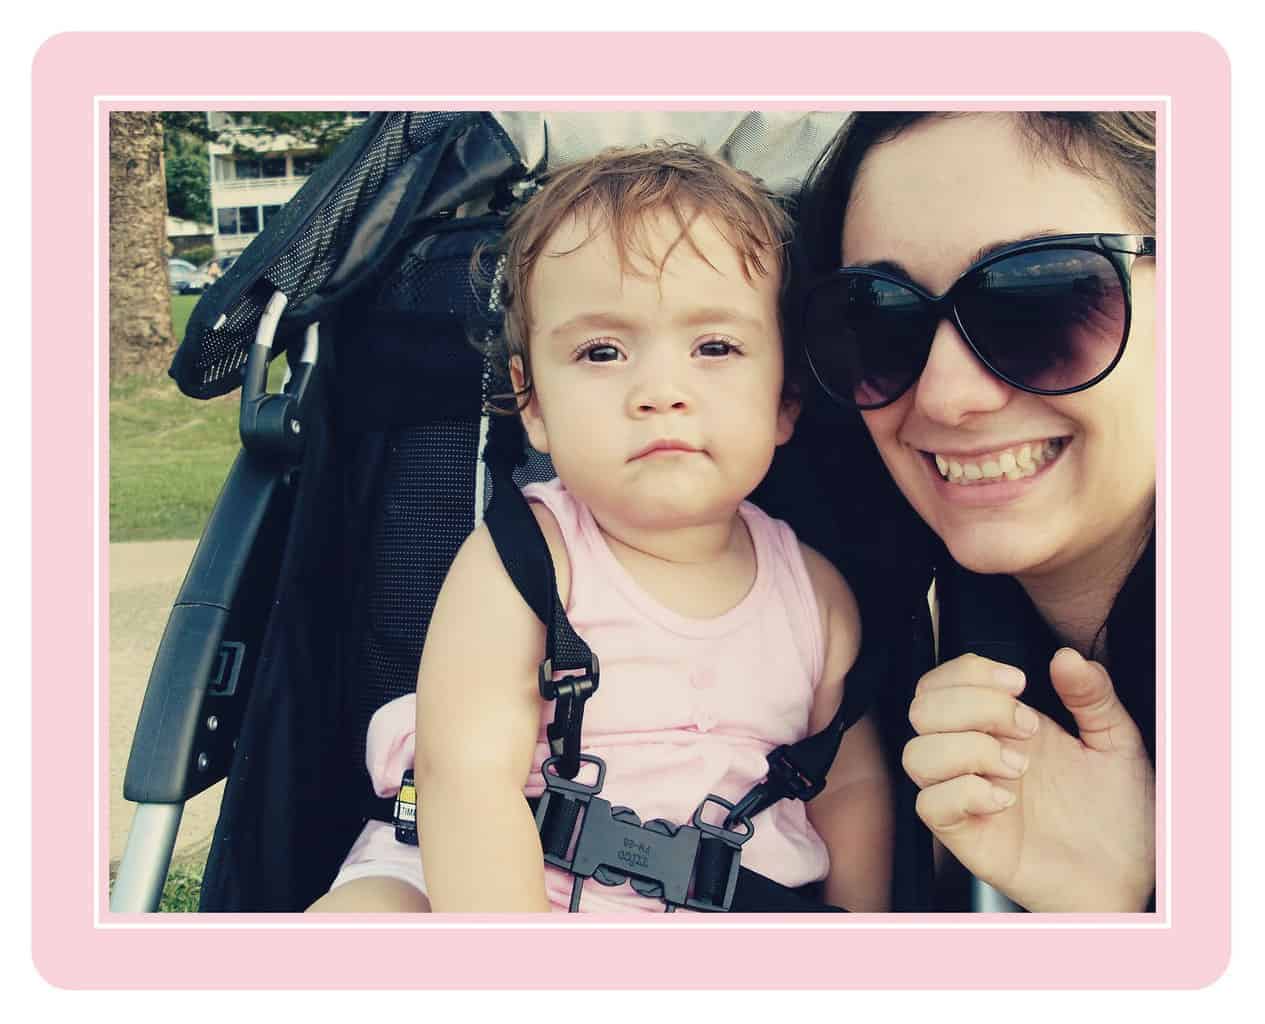
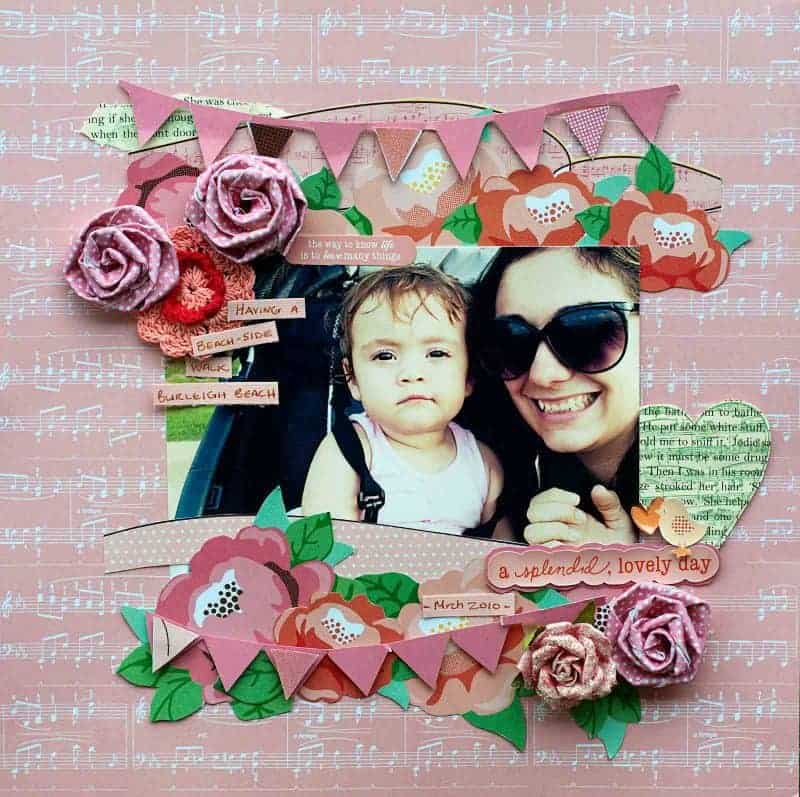
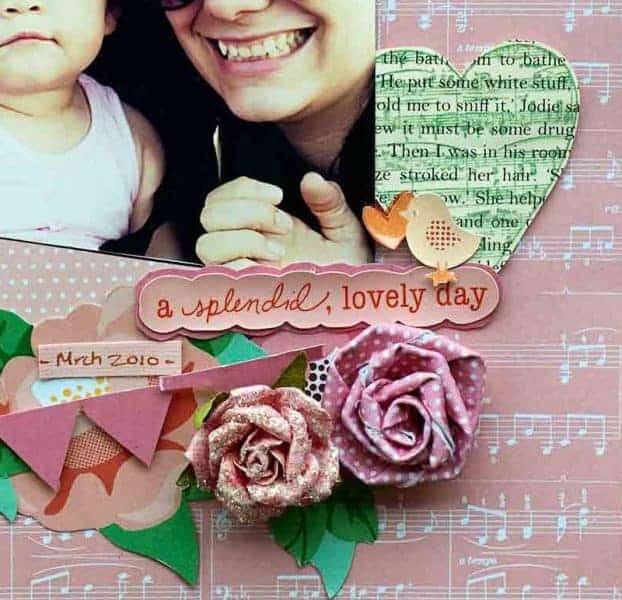
Don’t forget that you can always create your own adorable die cuts. We love using a Cuttlebug (if you don’t mind using dies), but you can read through our die cutting machine review of the ten best machines here. Hope that inspired you to make some cards today. Till next time, Samantha xxx DIY: Using Die-Cuts to Make Your Own Cards was originally published to: https://thebestvinylcutters.com/ via WordPress https://cuttercraftsbysamantha.wordpress.com/2018/11/20/diy-using-die-cuts-to-make-your-own-cards/ Sometimes you manage to capture a photo that just melts your heart! Jolene grabbed this photo of herself and her little Lily. Totally in love with that smug look on Lily’s face!
She applied a slightly pink filter to the photo in photoshop and this help set up the color scheme that she wanted to work within her layout.
A Splendid Lovely Day:DIY with Step-by-Step InstructionsThis layout features some beautiful buntings. Buntings can create an interesting border and is a great way to step away from the torn paper edge border, or the scallop border or that ink border that you see everywhere. Banners are a great way of providing a detailed border to add interest to the layers or photos of a layout. It is also just a great way of framing that all important photo.
– Supply List:
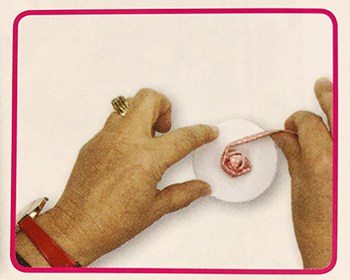
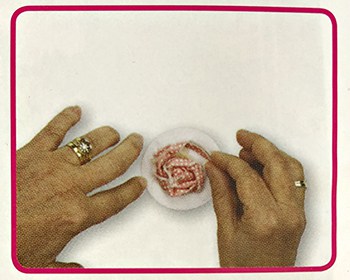
Step-by-Step Instructions:Step 1: Cut nine patterned paper roses from a patterned paper. Alternatively, you can use to create some custom flowers for you. We will be using these flowers at the top and bottom of the feature photo. Step 2: Cut 2 wavy strips of patterned paper strips. Step 3: Adhere the photo to sit to the middle right of the page and position the flowers and wavy borders to sit slightly over the photo (see photo for a clearer idea on this). Step 4: Create two triangle banners and stick them down using pop dots. Step 5: Hand-make some roses by circle punching three circles to be about the same size as the completed roses. Cut three strips of patterned paper from the sticky backed material paper. With the sticky back exposed, fold both of the edges in towards the middle creating a firm material strip to hold the roses. Tie a knot in one end. Step 6: Place liquid glue or hot glue on the punched circle base and place the knot of your in the middle. Start with a tight roll, which creates the centre of the rose, build up the rose by rolling the material around your centre twist and roll and repeat. When you are happy with the look of the rose, cut off the remaining material. Repeat the process and create two more roses.
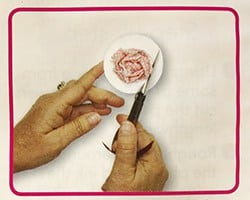
Step 7: Cut off any exposed cardstock from your punched circle base and add a button, brad or bling in the centre of your flower if you wish. Step 8: Add two of the roses to the top left corner of the photo and then add a beautiful crochet flower in the middle of the two roses.
Step 9: Add a quote embellishment sticker to sit over the top of the photo and right next to your material roses. Step 10: Adhere the other material rose to the right of the rose border and below the photo. Adhere the Prima rose next to the fabric rose. Step 11: Use the Stampendous stamp to stamp out a heart onto old book paper and once dry, cut it out. Add the heart to the layout, gently tuck the left corner slightly under the right bottom of the photo.
Step 12: Add the title embellishment sticker or use alphabet stickers to create a title. Step 13: Write your journaling on some Bazzill cardstock. Cut these up into strips and adhere them don on the top left of the photo.
And there you have one beautiful layout complete. Buntings work really well on a number of scrapbook layouts. I really love using them on birthday or party-themed layouts and they are brilliant for baby scrapbook pages as well. Have you tried using buntings? We would love to see your work! Till later, Samantha xxx The following post DIY Mommy & Daughter Layout with Handmade Material Flowers was originally published on: https://thebestvinylcutters.com via WordPress https://cuttercraftsbysamantha.wordpress.com/2018/11/20/diy-mommy-daughter-layout-with-handmade-material-flowers/ After some Scrapbook Christmas layout ideas? We here you! We find Christmas layouts the hardest to create. So to give you a bit of a creative boost, we wanted to share these 6 beautiful Christmas scrapbook ideas. Out designer, Jolene, has completely outdone herself. Lucky she has some beautiful subjects to work with as well. So without further ado, here are 6 scrapbook ideas for Christmas photos.
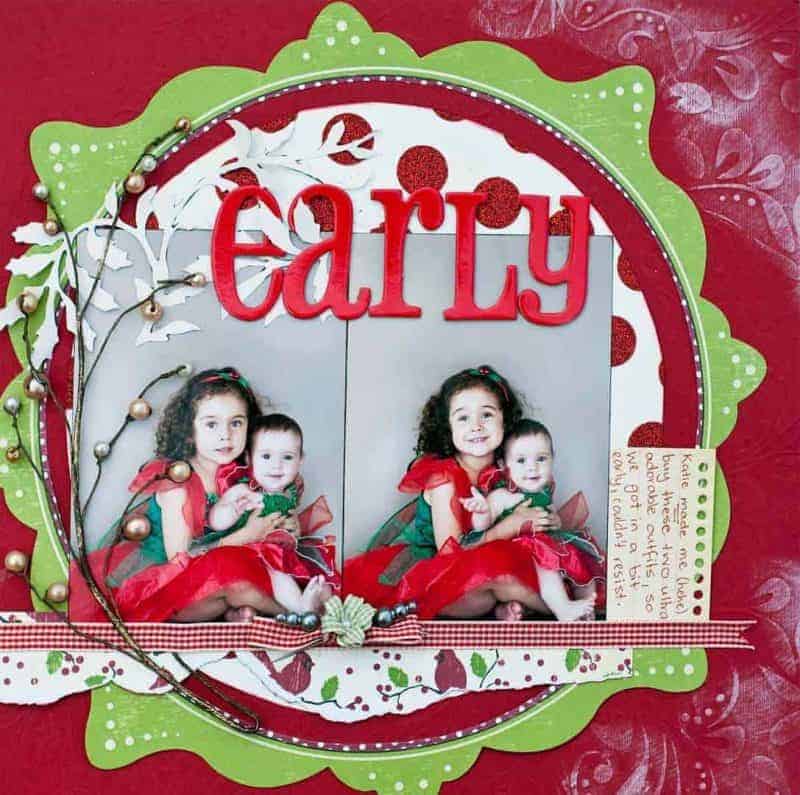
1. Scrapbook Christmas Layout Ideas: “Early”
Scrapbooking Christmas layouts before Christmas has even arrived? Yes well, so did Jolene! She found these two matching Christmas dresses in a cheap shop and she couldn’t help but grab some photos and whip up a layout. Early – yes, one month early to be exact! The interesting effects here? Grab an embossed cardstock for the base and simply lightly rub over some ink to help make the embossing stand out more. Tear some paper instead of cutting it to give it a creative border. Make sure your title laps over both the background and the photos. This will help bind your photos into the design (rather than them feeling like they were simply placed on top). Use an electric die cutting machine to cut out some beautiful delicate vine/leave die cuts for you. So much cheaper than buying them from the shops.
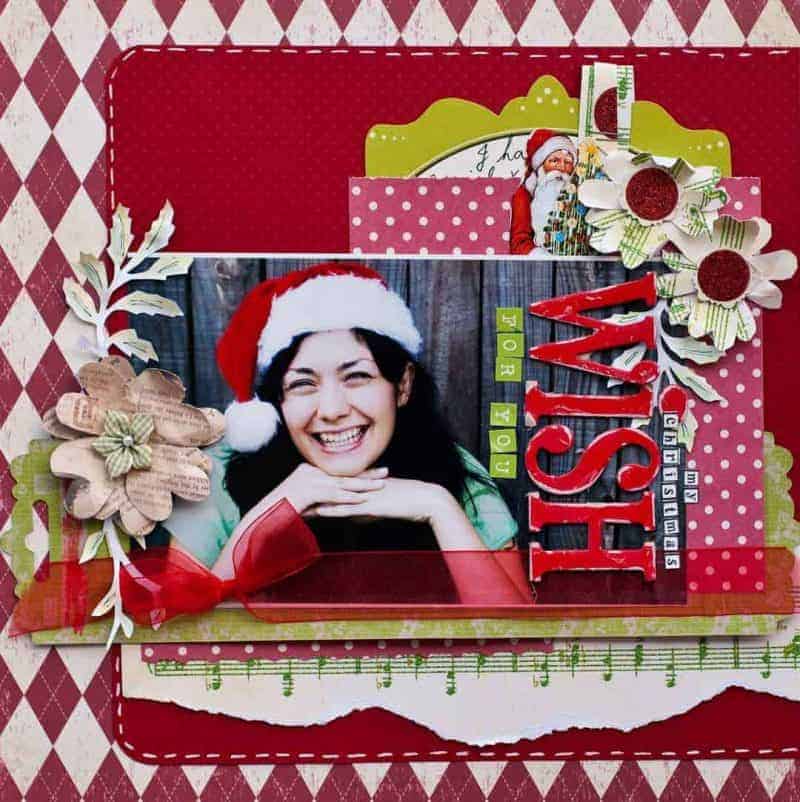
2. Christmas Scrapbook Ideas: “My Christmas Wish for You”
You know that corny Christmas hat that you bought for the kids? Why not pop it on. Set your camera on a timer and get a photo of yourself for a change? We love this layered Christmas page that Jolene created here. This time she created some flowers out of heart shapes. And she used up some leftover letters, by using different types for parts of the title. Speaking of titles. Did you know that we have a massive list of title ideas for those scrapbook pages of yours?
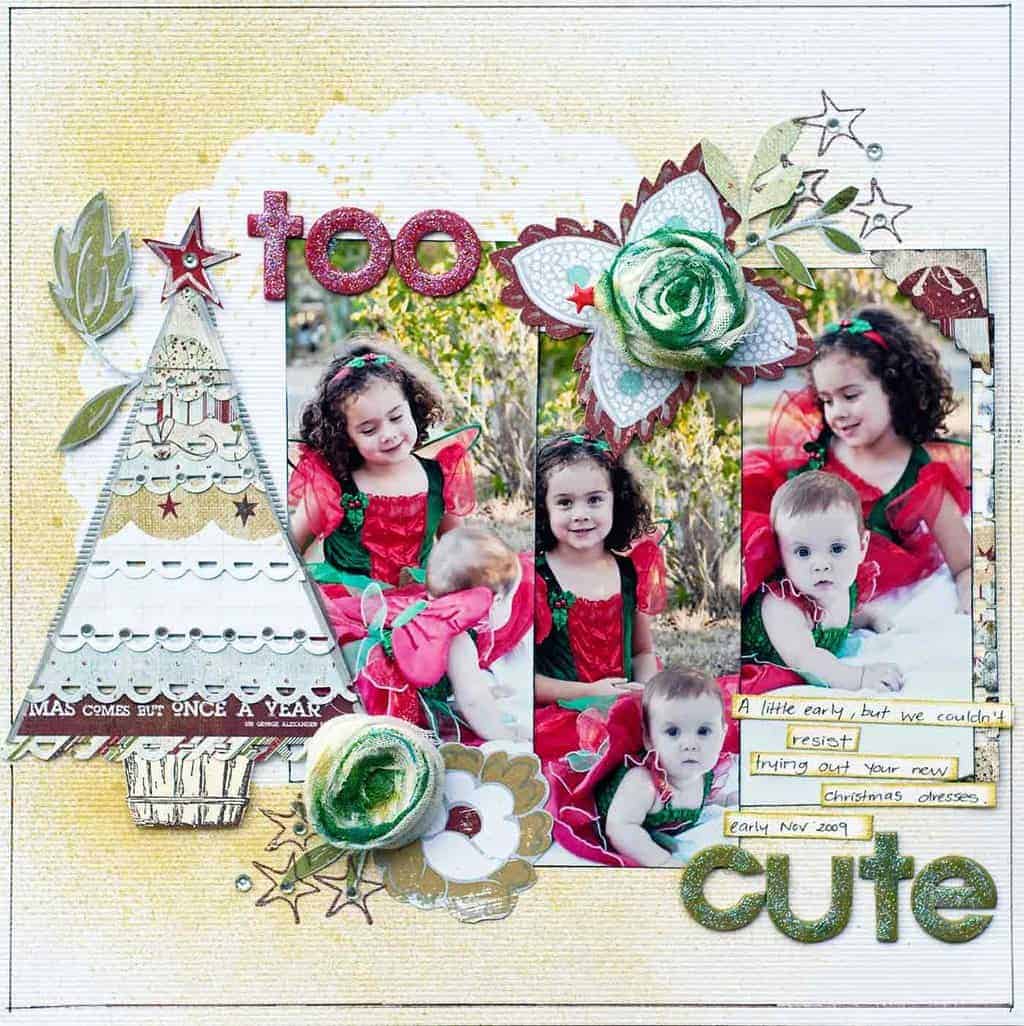
3. Scrapbook Christmas Ideas: “Too Cute”
This layout is a bit different and we love it! For an interesting background effect, why not pop a paper doily over some cardstock and simply use some ink spray to lightly spray over the top. It reminds me of ‘magic dust’ – perfect for a Christmas layout. Use some patterned paper to create the tree and a stamp for the basket. You can also create your own muslin flowers. For the tutorial on how to do that, click here. Last tip? Don’t always feel stuck in using standard size photos. Here Jolene cut down her portrait photos to get rid of distracting background – I feel like it tells the story so much better this way!
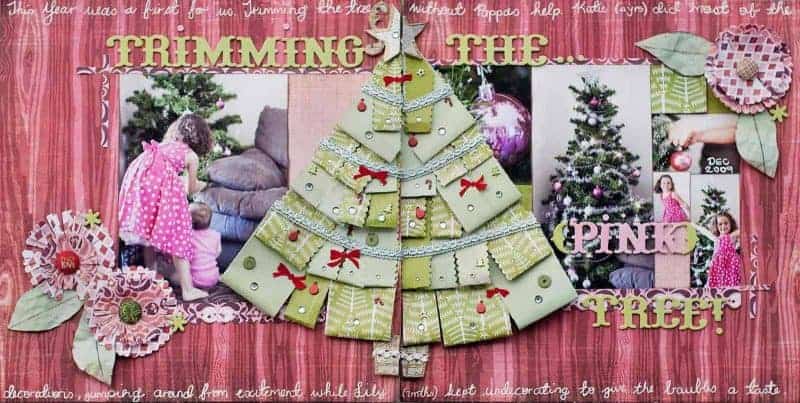
4. Christmas Scrapbook Layouts: “Trimming the {Pink} Tree”
After some double layout inspiration? We know that these are usually a lot harder to pull off. Jolene decided to do a Christmas tree across the center in order to bind these two pages as ‘one’. A collage of all of the photos filled up most of the space and to finish it off she simply cut out some scallop circles with her Cuttlebug die cutting machine and some Spellbinders scallop circle dies. Snip down each scallop towards the center, ruffle up the ‘petals’ to separate them a bit and simply pop a brad in the center to finish it off.
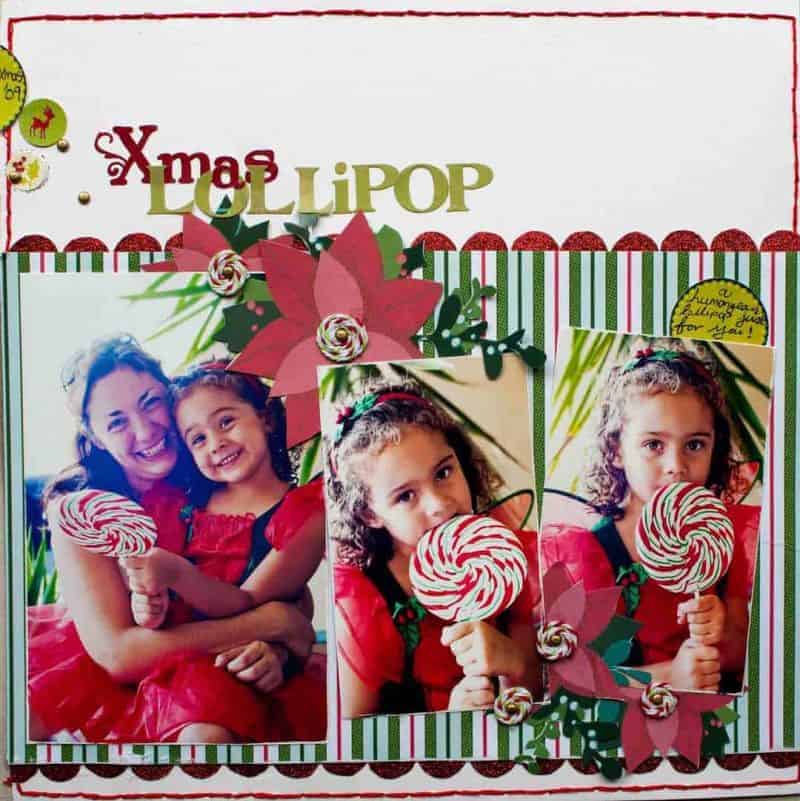
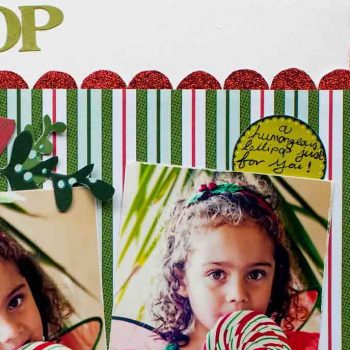
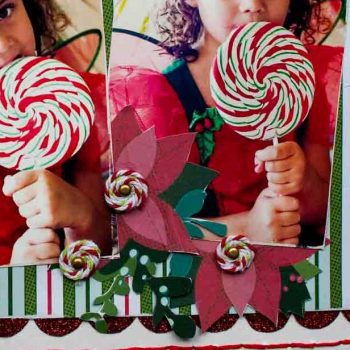
5. Christmas Scrapbook Pages: “Xmas Lollipop”
We won’t go into too much detail about this layout, because we actually have a full step-by-step tutorial on this layout on our blog.
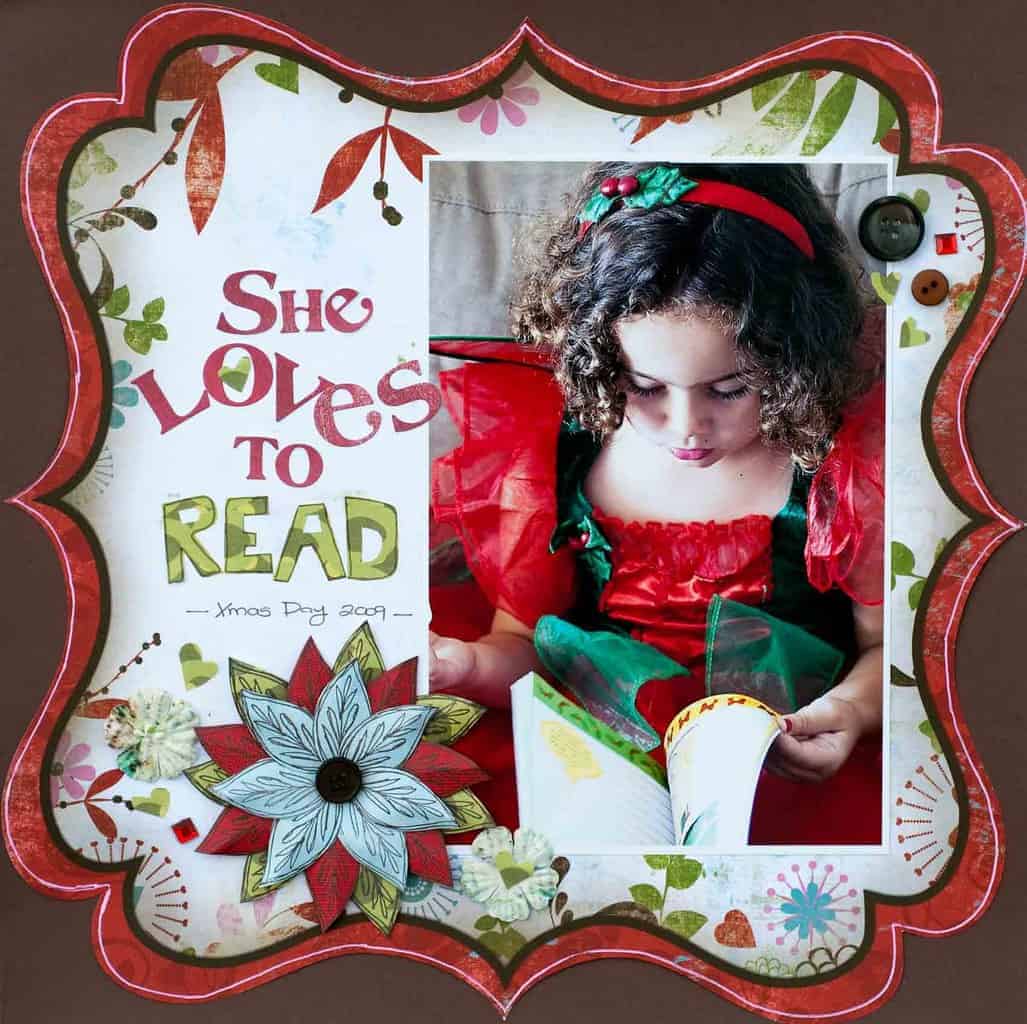
6. Scrapbook Christmas Layouts: “She Loves to Read”
Scrapbook layouts for Christmas can simple and still be striking! The power of this layout comes from a die cut shaped patterned paper. All Jolene did was outline the paper with a white pen (just to set it apart from the background cardstock). She added her photo and her sticker title. To finish off the page, she stamped out some leaves, which she used to create her layered flower design. Simple, easy, but beautiful!
We wish you all the best for Christmas this year! Please share your beautiful layouts with us by leaving us a comment below. All the best, Samantha xxx Scrapbook Christmas Layout Ideas: 6 Inspiration Scrapbook Pages! is available on: https://www.thebestvinylcutters.com/ via WordPress https://cuttercraftsbysamantha.wordpress.com/2018/11/19/scrapbook-christmas-layout-ideas-6-inspiration-scrapbook-pages/ In the need for some Christmas title ideas for either your scrapbook layout our that Xmas card? Don’t worry, we have you covered. We have collated some of our favorite card & scrapbook Christmas titles. Thought I would pop them on here – because after all, it is a nice easy way for me to find them when I get stuck myself. I’ve tried to keep the list shorter rather than making a never-ending post, simply because I feel a bit overwhelmed when I have to browse through 1000 titles ideas. We would love for you to add your favorite title ideas in the comments below the post.
Favorite Christmas Titles Ideas for Scrapbooking and Cards
A Snowy Blowy Christmas …you better not pout, I’m telling you why…. Tis the season for love and happiness 98% Nice 2% Naughty A Holly Jolly Christmas A Season Of Love And Laughter A Sleigh Ride Together With You A time for giving A Time of Wonder All Hearts Come Home for Christmas All I Want for Christmas is You All Is Calm, All Is Bright All That Glitters is Snow All Wrapped Up Allow peace into your heart this Christmas Another Christmas already? Seriously, what the Elf? Baby it’s cold outside, but you fill my heart with warmth Baby’s First Christmas Be Naughty, Save Santa a Trip Believe Believe In Miracles Believe in the magic of Christmas Believe In The Miracle Best wishes to you this holiday season Bring on the joy! Bring on the cheer! Celebrate the Season Christmas Baby Christmas Blessings Christmas Chaos Christmas Cheer Christmas cookies and Holiday hearts…That’s the way the holiday starts Christmas Cuties Christmas Glows with Love Christmas Is A Claus For Celebration Christmas is a Santa-mental time! Christmas is a special time when doubts and fears are melted away with love and hope Christmas Is A Time To Believe In Things You Can’t See Christmas Is Filled With Kids & Kisses Christmas is in the Air Christmas is not about presents. It’s about family Christmas is Sharing and Caring Christmas isn’t about what you receive – it’s about the love that you give Christmas Joy
Christmas Memories Christmas Surprise Christmas Time Brings So Much Pleasure When You Have Good Friends To Treasure Christmas Time Is Family Time Christmas Tree Shopping Christmas warms the soul and tickles the heart Come & see…the Christmas Tree! Cooking up Christmas Country Christmas Dear Santa Dear Santa, I can explain Dear Santa, I Want It All! Dear Santa, I want one of everything! Dear Santa, I Was Very, Very Good Dear Santa, I’ve Been Good Dear Santa… define ‘good’ December Delights December Magic Deck the Halls Decorating Cookies Delights Of December Don’t peek, don’t sneak, til’ Christmas Don’t say anything, but I think I just saw that creepy elf on the bookcase actually move Enjoying The Holly Days Everyone is a kid at Christmas! Everything is simply more meaningful at Christmas Fa-La-la-la-la Families Are A Special Part Of Christmas Family & Friends are the True Gifts of Christmas! Family Is The Best Part Of Christmas Feel the peace and love of Christmas in your heart this holiday season Festive Family Fun Festive Trimmings All Merry and Bright Friends and Family, that’s the meaning of Christmas Frosty The Snowman Fun & Frosty Giving feels even better than receiving Glad Tidings We Bring! Good tidings to you and happy Christmas for today and all the Christmases to come Happy Birthday Jesus Happy Holidays
Hark The Herald Angles Sing Have a Holly, Jolly Christmas Health and happiness from my family to yours Here Comes Santa Claus Here’s to many more holidays by your side Here’s wishing you the charms of Christmas all year long He’s Making A List Ho! Ho! Ho! Ho-Ho-Ho Holiday Delights Holiday Goodies Holiday Happiness Holiday Hustle and Bustle Holiday Magic Holly Days Holly Jolly Christmas Home For The Holidays Home is the Heart of the holidays Home is where the Christmas cookies and presents are! Homespun Holidays Are Stitched With Love Hope, joy, love, and gladness – let all these be your guide this holiday season How much longer must we wait? Please, Santa don’t be late! I always imagined kissing you under a mistletoe I Believe I Believe In Santa I Can ‘Bearly’ Wait For Christmas I love the snow. I love the tree. I love the stockings, the cookies, the candy canes and the giving of precious gifts. But, most of all, I love you. Merry Christmas I wouldn’t want to cuddle up next to the fireplace with anyone else, Merry Christmas! If love and happiness were snowflakes, I’d send a blizzard your way this holiday season! Merry Christmas my love If love is the reason for the season, I have a lot to be thankful for If you warm me with your holiday spirit, I promise to inspire you with my holiday cheer I’ll Be Home for Christmas I’ll Be Home For Christmas, You Can Count On Me I’m Dreaming Of A White Christmas In Search of the Perfect Tree It’s beginning to look a lot like Christmas It’s Christmas All Over Again! It’s Christmas Day So Let’s Go Play! It’s not the holly and the ivy, nor the lights on the trees, but you by my side that fills this holiday with the spirit of love It’s the Most Wonderful Time of the Year… It’s your Christmas! March to the beat of your own little drummer boy Jesus is the Reason for the Season! Jingle All the Way Jingle Bells Joy and love to you and yours this holiday season! Joy to the world! Joy, peace, and love unto you and your family this Christmas Joyful Noise Joys Of The Season Just What I’ve Always Wanted Keep The Wonder Of Christmas In Your Heart Laughter fill your home on this joyous holiday. Be comforted, be content, and give love. Let the kids dream of sugar plums, and others dream of snowy evenings Let the magic of Christmas bring love and peace to you and to the world Let the magic of Christmas bring you back to when you were a child Lets Leave Christ In Christmas Let’s Meet Under The Mistletoe Little Elves Little Treasures Look what I got! Love each day as if it were Christmas and you will always be joyful! Love Is The Light Of Christmas Love Is What’s In The Room With You At Christmas If You Stop Opening Presents And Listen Magical Christmas Magical Holidays May Christmas warm your heart the whole year long! May goodness and light follow you this Christmas and for all your days May the charms of the holiday season gladden your heart and lighten your burdens May the lights of the season fill you with warmth and joyous spirit May the splendor of the season warm your days and nights May this holiday season be filled with laughter, joy, and peace May you find peace this holiday season and glorious love in the new year May Your Days Be Merry & Bright May your holidays be merry and bright! Meet Me Under The Mistletoe Memories of the Holidays Meowy Christmas! Merry “Kiss”mas Merry and Bright Merry Christmas
Merry Christmas Baby! Merry Christmas to all and to all a Good Night! Mistletoe Magic My Christmas Angel(s) My Joy Naughty Or Nice? NEVER Naughty……ALWAY’S Nice!! No Peekin’ Nobody loves Christmas more than me, and I love you even more than Christmas… or at least it’s close Noel! Peace and joy to you this Christmastime! O’ Christmas Tree O Holy Night Oh Deer, It’s Christmas Old Fashioned Christmas On Santa’s Lap Our First Christmas Together: The Best Gift Is Each Other Peace and love to warm your heart this holiday season Peace be with you this holiday season and let it envelop you all of your days Peace On Earth Peace on Earth, goodwill toward all Please Come Home For Christmas Presents & Carols & Lights Rejoice Remember that magical feeling of waking up to presents on a Christmas morning? That’s how I feel waking up with you! Remember the Reason for the Season Remember when? Keep Christmas close and the memories will flood to you like a tide of joy Ring The Bells! It’s Christmas! Rockin’ Around The Christmas Tree S Is For Santa Santa Baby Santa Claus Is Coming Santa Claus Is Coming To Town Santa Collector Santa Delivers Santa Express Santa is real, if we believe. Bringing you the gift of a little magic this Christmas Eve Santa Stops Here Santa stuffed the stockings & we stuffed our faces! Santa Was Here Santa, PLEASE STOP HERE! santa….I want it ALL!!!! SANTA? Santa’s Elf Santa’s Helper Santa’s Little Helper(s) Santa’s Workshop Season’s greetings and best wishes for the New Year Sharing this season together is the greatest gift of all Shock & Awe Silent Night Sing, dance, rejoice in song – and treat yourself and others with kindness this Christmas Spreading Christmas Cheer Sure, Christmas is for kids, but luckily the holiday spirit makes children of us all Surrounded With Love The 12 days of Christmas guy really had a thing about birds, huh? Let’s hope you don’t know anyone crazy enough to give you 23 birds this holiday season The Beginning of Believing The best time of the year The holidays are special because I get to spend them with you The most wonderful gift I can receive this Christmas is to celebrate with you The Most Wonderful Time of the Year The Night Before Christmas The only app I’d like for Christmas is a “hAPPy holiday.” The Spirit of Christmas The Spirit Of Christmas Is All Around Us The stockings were hung….. The true meaning of the holidays is having a friend like you There is nothing quite like Christmas – the celebration, the decoration, and the pure excitement. Follow your joy this holiday season and in the new year There’s Magic In Believing There’s No Place Like Home For The Holidays There’s No Time Like The Presents There’s pure joy in the discovery that the best presents are the people whose presence is solely for bringing presents Thinking of you this holiday season with love and gladness. I’m so happy we are celebrating this joyous day together This holiday season let us treasure what is truly important in all our lives, the reason for the season: Cookies This House Believes in Santa Tiny Tots With Their Eyes All A-Glow Tis the season to be freezin’ Tis The Season To Be Freezin’ Tis The Season To Be Jolly Tis The Season To Be Merry Tis the Season Trimming Our Tree Twas The Night Before Christmas Unwrap My Heart Unwrap the FUN! Unwrap the Magic Unwrap the season UP TO SNOW GOOD Waiting For Santa! Wakey Wakey! Santa’s Been! We Believe In Santa! We have Christmas all wrapped up! We Wish you a Merry Christmas We wish you a merry Christmas, we wish you a merry Christmas, we wish you a merry Christmas and you’re welcome – that song’s now stuck in your head all day White Christmas Wish
Wishing you a merry Christmas and peace throughout the year With love and good tidings to you this Christmas and a joyous new year! With you, everyday is like Christmas! Wow, thanks Santa! Wrapped With Care Yes _____ (insert child’s name), there IS a Santa Clause You are the greatest gift I could wish for this Christmas You are the star on my Christmas tree, the marshmallows in my cocoa, and the Rudolph for my sleigh – here’s to another wonderful Christmas together! You Better Not Pout You’re never too old to stop believing in Santa
We hope you found some title inspiration from our list of the best Christmas title ideas for both scrapbooking and card-making. If you found one that you loved, please let us know which one it was in the comments below. Happy some fabulous titles to add to our list? Leave those below as well. Merry Christmas everyone! Samantha xxx Some of our Favorite Christmas Titles Ideas for Scrapbooking and Cards is republished from: https://www.thebestvinylcutters.com/ via WordPress https://cuttercraftsbysamantha.wordpress.com/2018/11/19/some-of-our-favorite-christmas-titles-ideas-for-scrapbooking-and-cards/ I’m not sure why, but I typically find Christmas layouts to be super tricky to make. I’m not sure why – it might be because sometimes I don’t like the Christmas scrapbook collections that are out, or maybe it is because I feel restricted to typical Christmas colors. Either way, they always challenge me, but I’m pretty proud of this layout that I whipped up. So much so that I wanted to share the full tutorial for the Christmas layout with you all. I hope you enjoy!
Xmas Lollipop: DIY Christmas Scrapbook Layout with Instructions |


 |
 |
 |
If you do happen to follow our instructions, or even if you feel inspired by some aspects of this layout, we would love for you to share a link to your creation in the comments below.
And if we don’t see you on our blog before Christmas – Merry Christmas to you.
Till later, xxx
Samantha
The blog post DIY Custom Christmas Scrapbook Layout: Step-by-Step Instructions is available on: thebestvinylcutters.com
via WordPress https://cuttercraftsbysamantha.wordpress.com/2018/11/19/diy-custom-christmas-scrapbook-layout-step-by-step-instructions/
Christmas time is coming up so fast! And we can’t help but feel all crafty and creative as the excitement of the season settles in.
In preparation for the big day, our design team member Jolene has whipped up these 3 super sweet DIY Christmas card designs.
 |
 |
 |
The beauty of cards is that you can easily use up your scrap pieces of patterned papers, those small pieces of ribbons and the random embellishments that never seem to have a place on a scrapbook layout.
We aren’t going to write up some step-by-step instructions for these ones as I think they are easy to replicate without the detailed steps, but let us know if you get stuck and need some more specific instructions on how to recreate them.
Create your own Christmas Cards
Here are our DIY Christmas card ideas to get those creative juices flowing.
Supply List:
- Red Textured Cardstock
- Patterned Paper
- Patterned Journaling Sheets
- Glitter Paper (or patterned paper with glitter circles)
- White Pen
- Silver Marker Pen
- Ribbon
- Pearls
- Letter Stickers
- Scissors
- Trimmer
- Large Corner Rounder
- Glue
- 3D Foam Dots
- Optional: Scrapbook Die Cutting Machine and scallop circle die
- Optional: Rub-ons
1. DIY Christmas Card Ideas: Merry Christmas
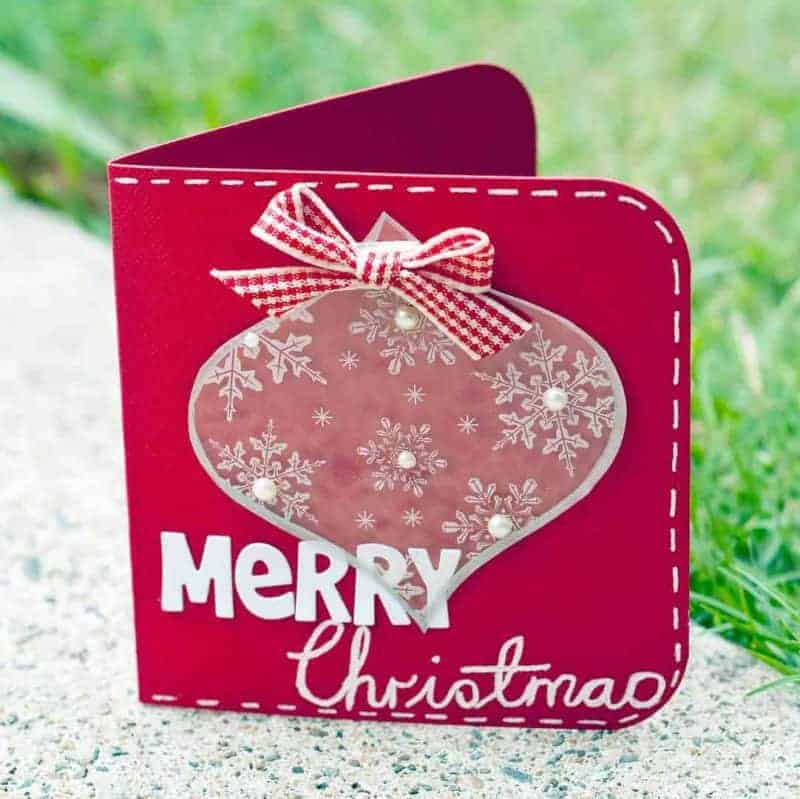
For our first Christmas card DIY ideas that we are sharing today, we have a super sweet, but pretty simple little bauble card.
The bauble itself is actually created out of a really old acetate journalling book (by Making Memories). Something that was lying around unused. I was inspired by the snowflake design and simply cut my acetate in the shape of a bauble.
I added some outline to the bauble with a silver paint pen and finished it off with some pretty pearl accents. I found a short piece of ribbon that I tied off as a bow.
The word “Happy” is from letter stickers. Again they are pretty old and these are from the Paper Trunk brand.
And finally, Jolene used a white Sukaru pen to create the border around the edge of the card, and she used it to handwrite the word Christmas (mostly because she didn’t have the right stickers left to actually do it out of stickers).
If you aren’t a fan of handwriting, you might be able to find the word “Christmas” on a rub-on sheet and use that instead.
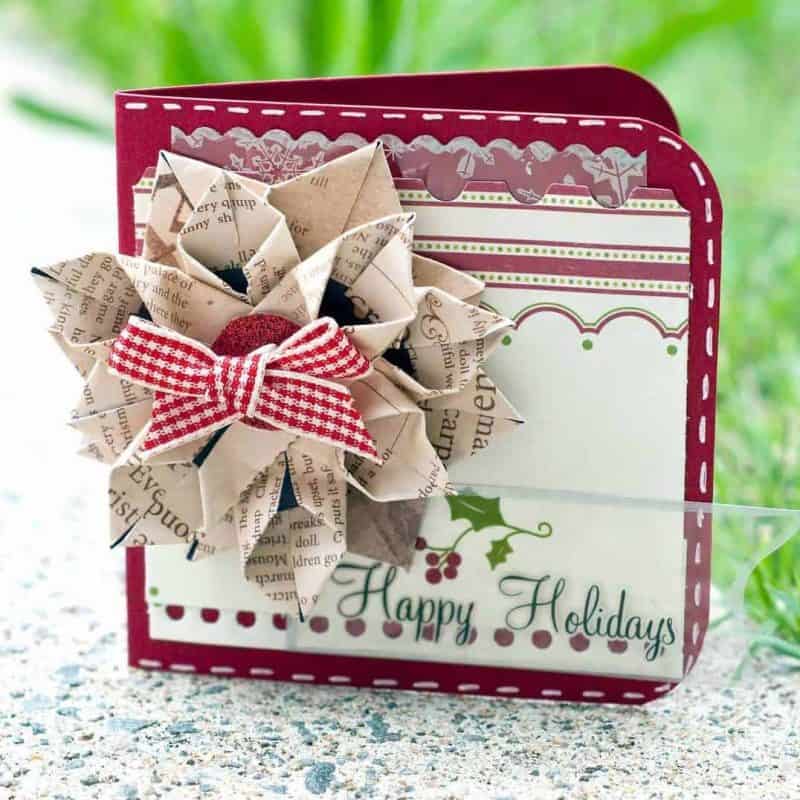
2. DIY Christmas Card Designs: Happy Holidays
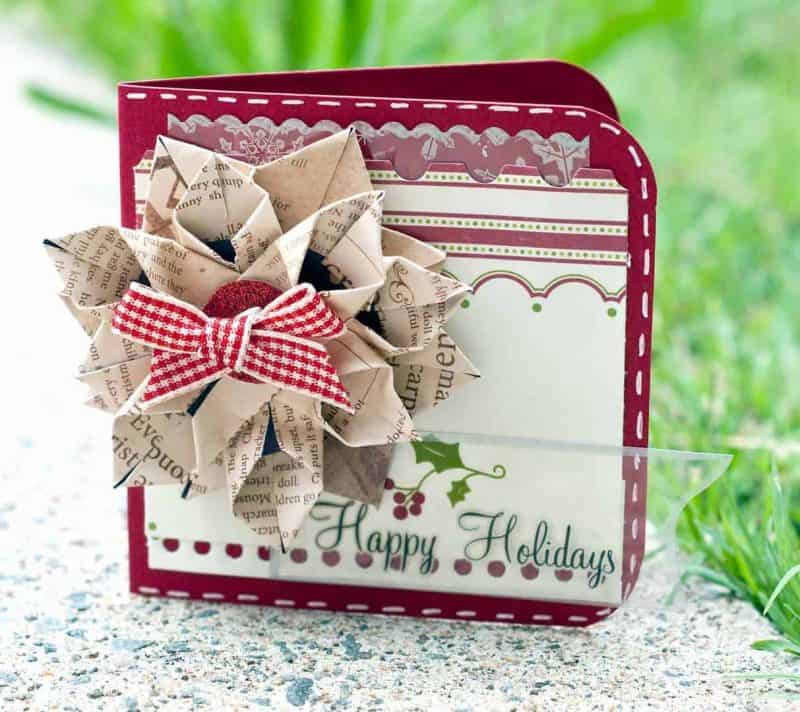
For the next card in our set of DIY Xmas card ideas, we have one that has a beautiful pop with that oversized paper flower. You can easily whip up this flower with some scrap paper – Jolene actually used some old book paper here to create her statement piece.
Let us know if you want us to share the instructions on how to create this stunning flower.
The rest of the card is layered with patterned paper and acetate journaling. And the flower is topped off with a glitter circle and another ribbon bow.
3. DIY Xmas Card Ideas: Xmas Joy
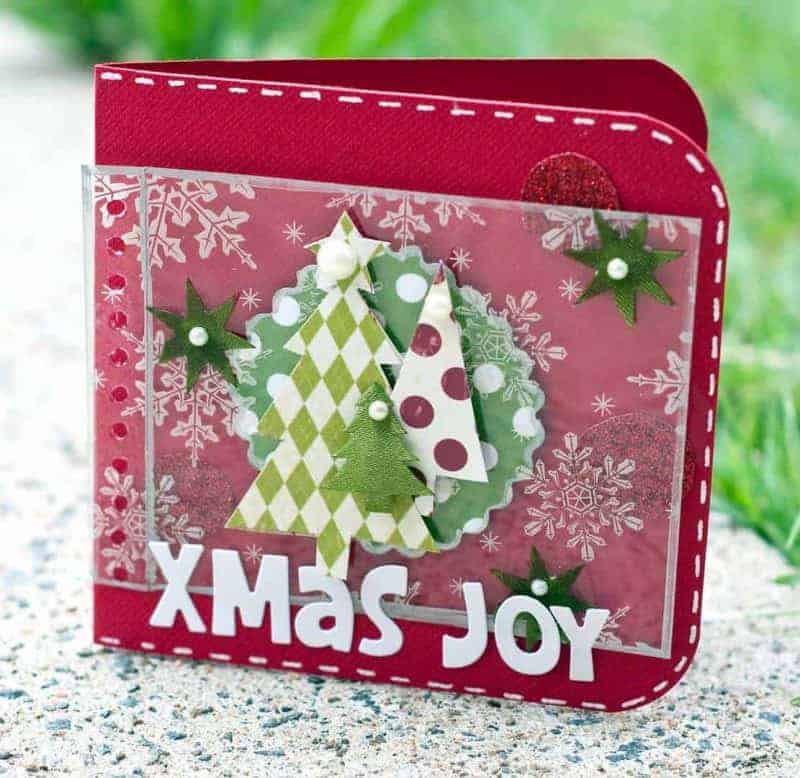
Ready to make your own Christmas cards now? Here is one last idea.
Jolene found a really old piece of patterned paper that had Christmas trees on it. So she cut them out and layered them up with some 3D tape.
Use your die cutting machine and a scallop circle die to cut a circle out of patterned paper to add behind your acetate. More silver and white penwork for detail work and some pearls – because who doesn’t love pearls! Easy Peasy!
Christmas card making doesn’t have to be hard.
You can easily whip up some custom Christmas cards with some simple and clean designs. Once you have a design that you like, you can quickly create Christmas cards in similar designs but with small changes – maybe use bling instead of pearls, change up the cardstock or the color of the ribbon.
And lastly, don’t forget that if you have a die cutting machine you can also create your own die cuts or your own stickers to use as well.
So now it is your turn to create your own Christmas card and we would love to see them. Please leave us a comment below.
DIY Christmas Card Ideas: Sweet Set of 3 Matching Cards is republished from: https://www.thebestvinylcutters.com/
via WordPress https://cuttercraftsbysamantha.wordpress.com/2018/11/18/diy-christmas-card-ideas-sweet-set-of-3-matching-cards/
Commonly known as HTV, iron-on vinyl, heat press vinyl, heat transfer vinyl and t-shirt vinyl.
So you want to buy heat transfer vinyl, but you don’t know where to start.
With countless options of heat transfer vinyl on the market in 2019, it can be overwhelming to find a quality brand that is not only affordable and reliable, but one that also come in a range of colors.
Whilst many people see heat transfer vinyl for t-shirt use only, you can in fact use in on a range of fabrics and is applied using either an iron or heat press.
[easyazon_image align=”center” cart=”n” cloak=”n” height=”750″ identifier=”B01GZLFE44″ locale=”US” localize=”y” nw=”y” nf=”y” src=”https://www.thebestvinylcutters.com/wp-content/uploads/2018/11/917pp3aPcTL.jpg” tag=”bestvinylmachines-20″ width=”800″]
You can also use HTV on items such as mugs and glassware in order to produce some beautiful custom dishwasher-safe designs. In this situation you would need a mug press to apply heat to your items.
We share our favorite HTV brands below in our best heat transfer vinyl review guide. If you wish to save time, you can simply grab the best selling heat transfer vinyl by clicking the link below.
>>> Click Here to see Prices of the Best HTV Vinyl
STOP THE PRESS!
BLACK FRIDAY DEALS ARE HERE, MAKE SURE TO KEEP AN EYE ON THESE POSTS:
- Best Black Friday Cricut Deals (Including Black Friday Cricut Maker Deals!)
- Best Silhouette Cameo 3 Black Friday Deals
6. MAREA Premium Heat Transfer Vinyl Bundle Review
* Amazon’s Choice – Assorted Heat Transfer Vinyl Packs *
[easyazon_image align=”center” cart=”n” cloak=”n” height=”583″ identifier=”B06W2JYJBH” locale=”US” localize=”y” nw=”y” nf=”y” src=”https://www.thebestvinylcutters.com/wp-content/uploads/2018/11/81VI5rAaARL.jpg” tag=”bestvinylmachines-20″ width=”800″]
The Bright Idea Supplies MAREA Premium HTV pack happens to be one that is currently marked as ‘Amazon’s Choice’. It comes in a nifty size: 10 x 12″.
What we love about this pack is that it comes with a 100% guarantee that if you aren’t fully satisfied with the vinyl pack, they will give you your money back.
We love the range of vinyls that are included in this pack: 14 solid color bundle includes 2 sheets of black, 2 metallic sheets (gold and silver), a full rainbow of bright colors for all of your crafting projects and 1 sheet of premium Glow in the Dark vinyl.
[easyazon_image align=”center” cart=”n” cloak=”n” height=”715″ identifier=”B06W2JYJBH” locale=”US” localize=”y” nw=”y” nf=”y” src=”https://www.thebestvinylcutters.com/wp-content/uploads/2018/11/81xdGkwUyqL.jpg” tag=”bestvinylmachines-20″ width=”800″]
Their vinyl is made with high quality polyurethane. Their brand offers flexibility without compromising the durability and strength of the vinyl.
On top of all of this, their vinyl is off course easy to cut, weed and apply.
It does a fabulous job of preserving its shape and vibrancy even after 100+ washes.
suitable for a wide range of fabrics such as: Cotton, Polyester, Viscose, Rayon and Cotton/Poly Blends.
Highlighted Features:
- Includes 20 solid colors
- Each sheet measures 12” x 10”
- Durable polyurethane fade-resistant material that is durable enough to withstand 100 washes.
- Comes with 100% satisfaction guarantee
7. Rozzy Crafts HTV Assorted Pack Review
[easyazon_image align=”center” cart=”n” cloak=”n” height=”534″ identifier=”B01GZLFE44″ locale=”US” localize=”y” nw=”y” nf=”y” src=”https://www.thebestvinylcutters.com/wp-content/uploads/2018/11/81hrRiIVpbL.jpg” tag=”bestvinylmachines-20″ width=”800″]
The Rozzy Crafts range of high quality durable vinyl is another popular brand that you can try out.
They have beautiful sheets of HTV that are made from polyurethane (PU). They are soft and perfect for detailed design transfers.
Rozzy Crafts’ heat transfer vinyl are easy to cut and easy to weed. Their vinyl has an adhesive layer which holds the design in place on the receiving garment.
We love that once you have applied the Rozzy Crafts standard HTV will allow fabrics to stretch through natural movement while maintaining excellent durability.
They are also durable and fade resistant and has the ability to withstand frequent washing.
Rozzy Crafts has the following types of vinyl for sale:
- Solid Colors
- Flock
- Glitter
- Metallic
- Glow in the Dark
- Hologram
Here are three of their bestselling types:
1. Rozzy Crafts Solid Vinyl Packs
[easyazon_image align=”center” cart=”n” cloak=”n” height=”334″ identifier=”B01GZLFE44″ locale=”US” localize=”y” nw=”y” nf=”y” src=”https://www.thebestvinylcutters.com/wp-content/uploads/2018/11/41BX2BS9CaL-1.jpg” tag=”bestvinylmachines-20″ width=”500″]
The Rozzy Crafts vinyl packs are very popular.
Each pack comes with 12 sheets of high-quality heat transfer vinyl. They are all 10 x 12″ in size.
Easy to cut and weed. Cold peel recommended.
2. Rozzy Craft Flocked HTV
[easyazon_image align=”center” cart=”n” cloak=”n” height=”500″ identifier=”B07D3JNF3R” locale=”US” localize=”y” nw=”y” nf=”y” src=”https://www.thebestvinylcutters.com/wp-content/uploads/2018/11/3179u8wDjsL.jpg” tag=”bestvinylmachines-20″ width=”500″]
Rozzy Crafts sells their flocked heat transfer vinyl in packs of 5. The sheets measures 10 x 15″.
We love the soft flock finish which will give your design a velvet-like feel.
Colors available to choose from:
White, baby blue, beige, black, blue, gray, green, orange, red and yellow.
2. Rozy Crafts Glitter HTV Vinyl
[easyazon_image align=”center” cart=”n” cloak=”n” height=”402″ identifier=”B06XG44CJB” locale=”US” localize=”y” nw=”y” nf=”y” src=”https://www.thebestvinylcutters.com/wp-content/uploads/2018/11/51aLRuiTGQL.jpg” tag=”bestvinylmachines-20″ width=”500″]
We are in-love with these glitter vinyl packs from Rozy Crafts. Each pack contains 18 sheets (10 x 12″ in size).
Fabulous colors range and great sparkly glitter!
Cold peel recommended.
8 . MiPremium PU Glitter Review
[easyazon_image align=”center” cart=”n” cloak=”n” height=”800″ identifier=”B076SJFXDS” locale=”US” localize=”y” nw=”y” nf=”y” src=”https://www.thebestvinylcutters.com/wp-content/uploads/2018/11/81k9bhRGlSL.jpg” tag=”bestvinylmachines-20″ width=”800″]
If you love glitter vinyl, you will love this divine glitter HTV pack from MiPremium.
The MiPremium HTV vinyl is a polyurethane, ready-to-cut material. As with all the vinyl on our list, their vinyl is easy to cut and weed. The vinyl has a film that makes fine detail weeding easier!
Their vinyl is thin and it also offers a high degree of elasticity and stretch. It is durable to withstand frequent washing and is guaranteed to not crack, peel or fade (when applied correctly).
The pack comes with a 30-day money back guarantee which is truly fabulous!
Package Content:
– 10 sheets of 10” x 9.8” pre-cut sheets of MiPremium vinyl in glitter. Colors included in your pack: Gold, Red, Pink, Dark Purple, Black Gold, Lavender, Green, Cherry, Black & Copper.
– 1 x detailed instructions guide with graphic illustrations on how to apply the vinyl.
MiPremium has solid color standard vinyl, as well as neon colored vinyl for sale.
9. RUSPEPA Glitter HTV PackReview
[easyazon_image align=”center” cart=”n” cloak=”n” height=”800″ identifier=”B071JP1NG8″ locale=”US” localize=”y” nw=”y” nf=”y” src=”https://www.thebestvinylcutters.com/wp-content/uploads/2018/11/91OJzONVKrL.jpg” tag=”bestvinylmachines-20″ width=”800″]
We love the Ruspera HTV glitter vinyl, because they comes in lovely large sizes of 10 x 19.5″. On top of that is also comes with a 100% satisfaction guarantee. So if you don’t like it, you can simply send it back for a refund.
The high quality heat press vinyl sheets are of course easy to cut, weed and press.
Glitter vinyl is brilliant for things such as jerseys, bags, hats and other fabrics. You can easily apply the Ruspera Glitter vinyl to the following fabric: cotton, polyester, blends, leather, brunet fabric, light color fabric.
The vinyl is made from imported elastic PU and Glitter powder, and has a PET film. It is durable and can withstand repeat washes without fading, peeling or cracking.
How to Use:
- Silhouette: 6 Rachet Blade 4 Speed
- Cricut: Light Cardstock
- Press: 302-320 degrees Farenheit / 15-20 seconds / Medium Pressure
- Hot Peeling
Highlighted Features:
- Includes 1 glitter HTV roll
- Each sheet measures 12” x 19.5”
- Durable polyurethane fade-resistant material
- 100% Satisfaction Guarantee
10. Silhouette Iron On Vinyl Review
![]()
Looking for the best heat transfer vinyl for Silhouette Cameo machines?
Silhouette’s HTV vinyl rolls is a film material which has a heat-activated adhesive backing, so it can bond permanently onto fabric.
It is fabulous for various fabric surfaces, from t-shirts, to jerseys to bags.
The beauty of their vinyl is that it can be loaded directly into a Silhouette cutting machine and does not require the use of a cutting mat.
We also love that this brand’s vinyl includes its own transfer liner, so no transfer tape is required.
Silhouette has the following types of vinyl for sale:
- Smooth
- Flocked
- Glitter
- Metallic
- Glow in the Dark
- Printable
- Reflective
Here are two of their bestselling types:
1. Silhouette Smooth HTV
[easyazon_image align=”center” cart=”n” cloak=”n” height=”500″ identifier=”B00MW8WB50″ locale=”US” localize=”y” nw=”y” nf=”y” src=”https://www.thebestvinylcutters.com/wp-content/uploads/2018/11/31533pjqsrL.jpg” tag=”bestvinylmachines-20″ width=”406″]
One of the most popular vinyls by Silhouette is one that has a smooth matte surface.
You can purchase them in rolls of 9 x 36″.
There are 30 colors available to choose from.
Easily adheres to most fabrics
2. Silhouette Printable Heat Transfer Vinyl
[easyazon_image align=”center” cart=”n” cloak=”n” height=”500″ identifier=”B005T444EK” locale=”US” localize=”y” nw=”y” nf=”y” src=”https://www.thebestvinylcutters.com/wp-content/uploads/2018/11/41JsB6LEz6L.jpg” tag=”bestvinylmachines-20″ width=”500″]
Silhouette is one of the few brands that has printable HTV on the market.
So if your wish to print your design before applying it with an iron or heat press, this is the one for you.
You can choose from printable iron on vinyl for either dark or light colored fabrics.
Supporting Information
Find below more helpful information that you will need to know before you start using vinyl for the first time.
1. Why should you use heat transfer vinyl?

- Heat transfer vinyl is fabulous for creating custom-made high-quality transfers.
- Think beyond using HTV to customize t-shirts, you can also use it to customize hats, bags, jerseys, wood panels, metals, mugs, glassware and more!
- Heat transfer vinyl are fabulous because they come in such a wide range of vibrant trendy colors. They also come in wide range of options- like opaque vinyl, metallic vinyl, glitter vinyl, holographic vinyl, glow-in-the-dark, reflective vinyl etc. So much fun!
- Another reason why you should use quality HTV is because they permanently bond to your fabric. If you purchase top heat transfer vinyl brands, you should be able to wash your tees and tumble dry them without having to compromise on color fading, cracking or peeling.
- Heat transfer vinyl is easy to use and you don’t need very expensive equipment in order to apply it properly.
- Heat transfer vinyl is more affordable in comparable to similar t-shirt printing methods, such as screen-printing and/or printing directly onto garments.
- But mostly, because it is an affordable way to create some truly unique custom made items.
2. What do I need to get started?

Here is a list of heat transfer tools that you need to get started.
Essential:
- Computer
- Vinyl Cutting Machine
- Heat Press/Household Iron/Cricut EasyPress
- Heat Transfer Vinyl
- Weeding Hook
Additional tools that is useful to have:
- Transfer tape (only really used with adhesive vinyl, but useful to have on hand)
- Light Table/Cricut Brightpad – helpful for weeding
- Adhesive remover
- Pressing pillow
- Heat Tape
- Teflon Sheets (only required for printable & digital heat transfer vinyl)
3. What is transfer tape, and do I need it?
[easyazon_image align=”center” cart=”n” cloak=”n” height=”500″ identifier=”B01F2VZQWI” locale=”US” localize=”y” nw=”y” nf=”y” src=”https://www.thebestvinylcutters.com/wp-content/uploads/2018/11/51AG2BuC10HL.jpg” tag=”bestvinylmachines-20″ width=”500″]
Essentially transfer tape is used to move vinyl from the paper backing to the surface that you want to transfer it to. You will typically only use transfer tape with adhesive vinyl – not with heat transfer vinyl.
Most HTV vinyls already have a clear carrier sheet that is used to protect the vinyl during the cutting process. You will then heat up the vinyl to get it to stick to your fabric before slowly lifting off the plastic carrier sheet.
It is important though to read up about the vinyl you will be using, as not all HTV has the clear carrier. You will also need transfer tape if you plan on using printable HTV, digital or inkjet transfers.
4. How To Use Heat Transfer Vinyl
Here are some quick instructions on how to use your heat transfer vinyl.
[easyazon_image align=”center” cart=”n” cloak=”n” height=”800″ identifier=”B071JP1NG8″ locale=”US” localize=”y” nw=”y” nf=”y” src=”https://www.thebestvinylcutters.com/wp-content/uploads/2018/11/71i2BnUpt8xL-1.jpg” tag=”bestvinylmachines-20″ width=”800″]
Step 1: Prepare the artwork
You can either download pre-made graphics (we call them SVG – see our list of FREE SVG files here) or you can create your own (only recommended for advanced users).
Most vinyl cutters comes with software that you can use to quickly set up your image so that it is ready to print and cut.
Step 2: Print & Cut
Once you are happy with the design you chosen/created, and you have set it to the correct size, it will be time to get it printed and cut.
Before you send it to the vinyl cutter, make sure to mirror-image your design. You will need to follow your machine instructions to find out how to mirror-image the graphic.
Also make sure to read up on what cutting settings the brand recommends for HTV vinyl.
Load the HTV into the machine. Make sure the backing of the HTV faces up.
And simply let the machine to the printing and cutting!
[easyazon_image align=”center” cart=”n” cloak=”n” height=”800″ identifier=”B071JP1NG8″ locale=”US” localize=”y” nw=”y” nf=”y” src=”https://www.thebestvinylcutters.com/wp-content/uploads/2018/11/71gk66HdGYL-1.jpg” tag=”bestvinylmachines-20″ width=”800″]
Step 3: Weed your design
After the design is cut, you will need to weed your graphic. Essentially weeding is just the process of removing all the vinyl that we don’t want/need.
You can easily pull away the large part of the vinyl that you don’t want, leaving the main design behind.
Use your weeding hook to lift up all the smaller intricate pieces that is left in the design.
[easyazon_image align=”center” cart=”n” cloak=”n” height=”533″ identifier=”B0734C5Y73″ locale=”US” localize=”y” nw=”y” nf=”y” src=”https://www.thebestvinylcutters.com/wp-content/uploads/2018/11/61dugnJhtlL-1.jpg” tag=”bestvinylmachines-20″ width=”800″]
Step 4: Apply Heat
Preheat your item (eg. your T-shirt) by applying heat for around 10-15 seconds. This will remove moisture and wrinkles from the fabric.
Place your design on the shirt (with the plastic facing up) and place your iron or heat press on the design.
Using firm pressure, hold it in place for the required length of time (check the packet instructions of the HTV that you are working with).
Flip over your fabric and repeat on the other side.
[easyazon_image align=”center” cart=”n” cloak=”n” height=”533″ identifier=”B0734C5Y73″ locale=”US” localize=”y” nw=”y” nf=”y” src=”https://www.thebestvinylcutters.com/wp-content/uploads/2018/11/61eA95V2BCL-1.jpg” tag=”bestvinylmachines-20″ width=”800″]
- Further Reading:Click here to learn more about how a heat press machine works.
Carefully peel away a corner of the backing to make sure that the HTV stuck the fabric. If you need to, you can apply more heat to the HTV to ensure that it bonds porperly with the fabric.
Check the packet instructions of the HTV you are using to see whether it is a hot- or cold-peel vinyl. All that means is that you should remove the plastic whilst the vinyl is still hot, or should you wait for it to cool down first.
And you now have your first completed custom HTV item! Hooray!
For one last handy tip: Here is a List of the Best Places to Buy Iron-On Vinyl!
Please let us know in the comments if you found our guide to the top 10 heat press transfer vinyls useful. Thanks!
The following blog post 10 Best Heat Transfer Vinyl Reviews 2019 [Comparison Table Included] is available on: thebestvinylcutters.com
via WordPress https://cuttercraftsbysamantha.wordpress.com/2018/11/16/10-best-heat-transfer-vinyl-reviews-2019-comparison-table-included/

Hi, I’m Sam!
I’ll be honest, I’m a total vinyl cutter addict! I could easily lose myself in a day filled with vinyl cutting projects! I have a whole career based on working with vinyl cutting machines! I worked with smaller vinyl cutters in a papercraft wholesale distribution warehouse. Later I coached those who were interested in turning their cutting crafts into small businesses. I have used all the machines that I recommend and have personal experience with both the positive and the negatives of each of these machines! I hope you find all the answers you are looking for, right here on my site!
 RSS Feed
